
editorial / january 07

Happy New Year! Sorry this newsletter is a few days late, but the festivities and holidays got in the way, which caused a small delay, and then we decided to wait another day just so we could bring you the superb FPS Creator Model Pack 6, and Update 1.04 Final. Even so, I'm sure you'll agree this is still a pretty neat issue with plenty going on for everyone.
This issue marks the 4th year of publication for our newsletter, and an awful lot has happened during that time. We've seen the company under-go a name change, a brand new web site released, stacks of new products and enhancements, new developments, the company staff roster has increased and partnerships deep within the gaming and hardware industry forged.
This newsletter has followed these events every step of the way. If it sounds like I'm waxing lyrical it is only because I'm very happy to have hit the 4 year milestone, and even though I am heading onto pastures new, I look forward to reading Issue 49 on February 1st, back at its allotted slot!
Cheers - It's been a blast
Rich
contents
(1) FPSC Model Pack 6 (2) TGC Gallery (3) NVIDIA Game Dev Compo (4) FPS Creator News (5) TGC on YouTube (6) 3D Guru: Normal Mappnig (7) Dark Shader Video (8) Bombzuka (9) DBPro Master: XML (10) News Round-up (11) Lee's Tip of the Month (12) From the Forums (13) Dark GDK.NET (14) Tech Tips: 48 Hour Game (15) Wenslydale anyone? (16) PlayBasic News (17) Winner (18) Outro
FPS Creator Model Pack 6

FPS Creator Model Pack #6 is now available! This pack features 16 ultra-realistic modern weapons for your FPS Creator games. The weapons include proper hands, new sound effects, high quality animations, brand new muzzle flash effects, animated arms, accurate gun specifications and the ability to dual wield! (certain weapons only). Also included in this pack are a brand new set of Docklands Warehouse segments and roof entities.
- 16 Fully Animated Ultra Realistic Weapons
- Including: 3 Dual Wield weapon sets
- Including: 2 Grenade Launchers
- AT 9 - semi automatic pistol
- Suppressed AT 9 (silenced pistol)
- Dual AT 9 pistols
- Shorty - breeching shotgun
- Sporting12 - 12 Guage automatic trap shotgun
- Ingram - Submachine gun
- Dual Ingrams
- Suppressed Ingram
- MP5K - Submachine gun, Personal Defence Weapon variant
- Suppressed MP5K
- Dual MP5K's
- G3 - Assault Rifle
- MSG90 - Military sniper rifle - semi automatic
- LMG23 - Belt-fed Light Machinegun
- M79 Impact - Grenade Launcher Firing impact exploding grenades
- M79 Timed - Grenade Launcer Firing delayed explosive grenades
- Brand new animated hands / arms
- New muzzle flash effects
- New Docklands Warehouse Segments
- Matching roof entities
Note: Model Pack 6 requires that you upgrade FPS Creator to 1.04
Upload screen shots to our Gallery
Today we have released a new Gallery section on our web site. The aim of the Gallery is for you to upload screen shots of games created with our products (DarkBASIC, FPS Creator, etc) for the rest of the world to see.
You can add in extra information about the game such as a link to a forum thread or YouTube video, as well as writing details about the screen shot in the 'More Information' area. All uploads are approved by TGC staff before they appear in the Gallery, but once visible they will be seen by the thousands of visitors we receive to our web sites each day.

All you need is to be registered on the TGC web site. If you are registered then click the button to upload as many screen shots as you like. You do not have to only upload screen shots of games that you have made yourself. For example if you really enjoyed playing a game created in DarkBASIC then why not take some grabs of you playing the game, and then upload.
To see what is already in the Gallery click here. You can filter the screen shots by game making tool, change the quantity per page and even rate them.
Submit your games to the NVIDIA Competition

As the deadlines for the NVIDIA Game Dev Competitions are looming we thought it was time we told you how to send your games to us! These instructions also apply to both the FPS Creator and DarkBASIC Professional contests.
Step 1 - Create an author.txt file
Using Notepad (or any text editor of your choice) create a file called author.txt. Place it with your game EXE. This file must contain:- Game Version number (see below)
- Put 'FPSC' or 'DBPro' to tell us which category you are entering
- Your full name (not your forum name)
- Your postal address, including country of residence
- Your email address
This file will be REMOVED when we make your game available for download.
We respect your privacy. This file is for competition administration purposes only.
Game Version number: We often find that developers send us their game, then frantically email saying "I've made an update / found a bug, can I send a new version?". If the deadline hasn't expired then the answer is: Yes! But we will use the author.txt file to determine what is the most recent version you've sent us. So the first time you send us a game you put: Version 1. If you send us another version, put: Version 2. And so on. You can submit your game as many times as you like, just make sure you keep increasing this version number, because we'll use it to work out what the final version of your game was.
Step 2 - ZIP it all up
Using whatever compression program you like, create a single ZIP file of your game. Make sure you have included everything - the exe, all media it needs, the author.txt, etc. You cannot use any other compression format other than .ZIP. Once compressed check the zip file is 250MB in size or less.Step 3 - Send your game to us
You have 5 options available:
Email Attachment. If your game is small enough for your email system to handle, then you can email it to us. Send the zip file to: [email protected]. We will reply to acknowledge receipt.
File Upload Service. There are lots of services on the web such as YouSendIt.com where you can upload a file to us using your web browser. This is a good option if you don't have your own web site or FTP experience (and your game is 100MB or less). Here is how to use YouSendIt.com: Enter our email address as the 'Recipient' ([email protected]), select the zip file of your game (click Browse) and then click 'Send It'. Nice and simple. You will receive an email from us when we have your file.
Web Space. If you have your own web site you can upload your game there, then email us a link to download it from.
FTP. You can upload your game to our FTP server. The details are: Server: ftp.thegamecreators.com, Login: anonymous: Password: anything. Put your game into the /incoming/ directory. This is a WRITE ONLY folder, that means you will not be able to see the contents of this folder, nor your game after it has uploaded. This is quite normal (it's called 'security'), but you CAN upload here. If you are an FTP noob then we suggest picking another option. If you wish you can email us once the file has uploaded and we will reply to confirm the success of the upload.
Mail us a CD. You can post us a CD with your game on. Be aware that we can not be held responsible for CDs going missing in the post, or not arriving in time for the deadlines (any CDs received late will be binned. Nor will we return any CDs we are sent. Despite these things if you'd like to send us your game on CD then post it to: The Game Creators Ltd, NVIDIA Compo, 4 Nancy View, Bollington, Cheshire, SK10 8QG, United Kingdom.
What if I need to send another version?
No problem. Just increment the 'Version' in the author.txt and re-send it to us using any of the methods above.
FPS Creator News Fest

The FPS Creator world doesn't sit still right now! Here is a selection of what's hot and new.
FPS Creator Update 1.04
The subtle number increase from 1.03 to 1.04 belies the massive number of changes that have gone on under the hood in this revision. There are no less than 58 changes including new features, enhancements and fixes. Multiple public releases of the upgrade, and beta tester feedback as we went, has all contributed to the best version of FPS Creator ever.
To ensure a smooth upgrade process, follow these guidelines:
- Uninstall any update you may be running on your system (1.02, 1.03, 1.04 betas).
- Download and install the new 1.04 update
Note: If you have FPSC Model Packs 3 and/or 5 installed then we strongly advise you uninstall these and re-download new versions of them from your TGC Order History. The original packs included FPS system files inside them and these are now old and redundant.
One of the most important changes is that we've completely replaced the old light-mapping system with our new Dark Lights technology. This gives much faster light mapping speeds, and much better end results than before. The version of Dark Lights now built into FPS Creator fully supports both dual and quad core processors. This means if your CPU allows, you can lightmap your scenes significantly faster. Our test results show dual core systems mapping scenes at up to 70% quicker than single core. The bigger the game scene, the larger the speed increase was.
1.04 also pre-calculates the physics static geometery in the Build phase. This means it can be loaded in real-time, which provides for a significant time saving when loading your game.
A number of the brass and decal assets have been updated. This provides for better quality visuals when firing the weapons. The brass ejections were also modified for more realistic handling, especially when firing weapons at extreme angles. A new FPI value of SMOKEDECAL means you can now customise the gun smoke decals to your own files. Also on the visual front, you can now have fog in your levels, with full control over the fog colour and distance.
An important new change is that when loading an FPM file, it will now be checked to see if it contains any entities or segments that are no longer used in the level. If found they will be automatically removed, freeing-up resources and keeping your final game EXE more compact.
This exciting new update can be downloaded from the FPS Creator web site.
Synergy IDE supports FPS Creator
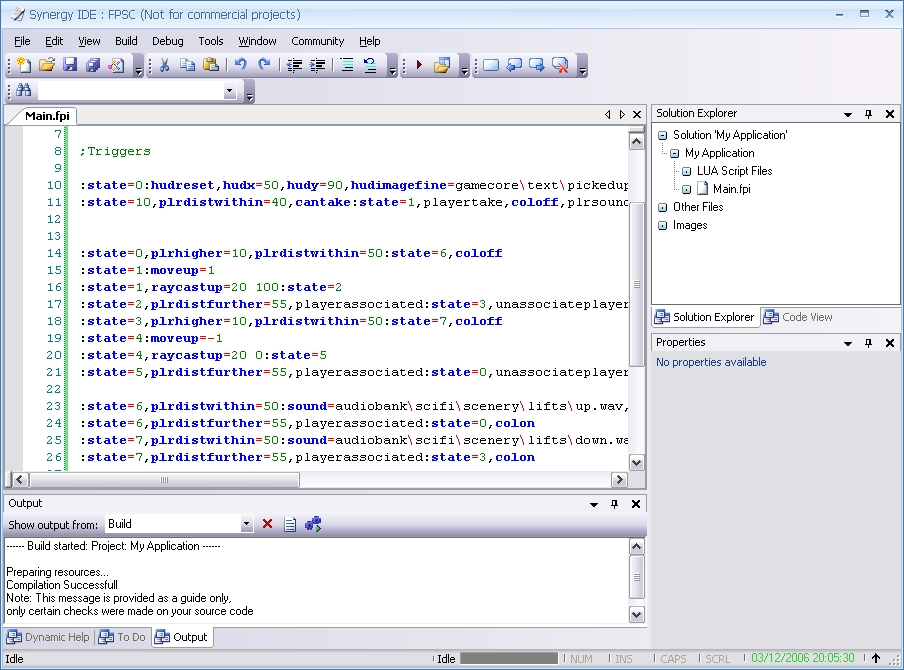
 John Youren has added FPS Creator FPI Script support to his Synergy IDE editor. This means you get FPI syntax high-lighting, Project based FPI collections and the best feature - FPI Compilation, which basically verifies that the syntax used in your FPI scripts is correct. Check out the web site for further details and a free trial download. Or you can click here for a full-res screen shot of the editor in action.
Umbra Episode 2 : Lucid
Umbra was one of our favourite FPSC game demos of 2006 - and a new version is due shortly. For those that don't remember, Umbra was a superbly weird and atmospheric puzzler - with trippy graphics and sound. Do yourself a favour and check out the shots of Umbra 2.
TGC Videos on YouTube

We've recently uploaded a stack of new videos to YouTube for you to watch. They cover everything from company news and product demonstrations, to games created in FPS Creator, DarkBASIC and DarkBASIC Professional. Take a look at the following:
FPS Creator Model Pack 6 Video
See all the new weapons in action. The pack also comes with a few segment pieces and these are used in this preview.
FPS Creator - lightmapping using 'n' core
Check out the amazing speed increase during test or make game when you use the latest V1.04 version of FPS Creator on Dual or Quad Core PCs. This video shows the great results seen on a Quad Core system as a map with many lights gets built.
FPS Creator X10 Video
Witness some of the spectacular effects that will be present in FPSC X10.
DarkBASIC Professional X10 Video
Not much to see, but listen as Lee explains the coming changes that DBPro X10 will bring.
Gem Towers
Watch this superb puzzle game in action. The game was the front cover star of Newsletter Issue 41, where you can also read a review of the game and grab the download.
Star Wars Retro Remake
This superb game won 3rd place in the recent Retro Remakes Competition. Watch the video to understand why! Then download the game and enjoy this mighty-fine remake.
Bombzuka
Bombzuka won 8th place in the Retro Remakes Competition. You can read the game review elsewhere this issue, or click the link to watch a video of Bombzuka in action!
The Little Eggy that Could
Another cute litte game by Matt Pilz (author of Bombzuka, above).
TGC at the NVIDIA 8800 Launch Event
In late November we were invited to attend the NVIDIA 8800 and showcase FPS Creator X10. In Issue 47 of the newsletter we gave you a video download of the event. For those of you who couldn't view the video, or download it due to its size, we have broken it into two parts and uploaded to YouTube. Here is Part 1 and here is Part 2.
3D Guru - Normal Mapping a Character - by Mark Blosser

Editors Note: You can download a PDF version of this article which has all of the full-res images in-line. See the note at the end.
In this article I will explain how I go about creating a normal mapped game character. For those who are unfamiliar what a normal map does, it is an additional texture map that, in essence, will make a low poly model look like a much higher poly model. When done well, the effect can be stunning, and can make a relatively low poly model look like a multi-million poly model!
Normal maps have been around for a few years now, and can almost be considered mandatory for creating next-gen game models. While I can't take credit for "inventing" many of the techniques in this article, I am presenting these tips as tried and true methods of working.

What you'll need is a low-poly game-ready version of your model, and also a detailed high poly version. The sky's the limit as far as how detailed you make your high poly, just remember that a normal map is still just a texture map, and you are limited by the number of pixels in the texture. I've found that normal maps work best for the big details (even though it sounds like an oxymoron!). Also keep in mind the distance from the player your character will be seen, it's easy to get caught up in tiny details, but if your character will never be seen up-close, it's best to leave the smaller details to the diffuse texture.
You won't need UV's on your high poly model, but you WILL need your UV's on your low-poly model, and the rules have changed a bit with normal mapping. Seams are your worst enemy; you could have an absolutely seamless diffuse texture, yet seams will still show up once your normal map is applied, and this almost always happens regardless of the game engine. Try and have as few seams in your UV layout as possible, even if this means wasting a little texture space. Unwrap your model in large contiguous sections, pelt mapping is useful for this. Some seams are unavoidable, so try and hide them in inconspicuous areas, or where real-life seams would occur, such as a break between clothing and armor. Also, try and run your UV's in horizontal or vertical lines as much as possible, this will avoid aliasing in your normal map and produce nice sharp details, rather than "jaggies", especially for non-organic or mechanical details that need crisp detail.
 There is one last thing to mention about
your UV layout, and that regards mirrored and overlapping UV's. It's long been a common practice to have
mirrored UV's that overlap for symmetrical body parts, this saves texture space
and also texturing time. But this
presents a problem with normal maps, often producing artifacts like
"inside-out" lighting when in-game. If
your game engine will not correct for mirrored UV's then you must give
everything it's own unique UV space. Also,
overlapping UV's should be moved outside the 1:1 UV square when baking your
normal map to avoid errors. To the left is one
of my UV layouts, notice the large UV "chunks", giving as few seams as possible. The red area indicates the main UV square,
the UV's outside of that square represent symmetrical areas of the model. They are offset by exactly 1.0, and since
UV's tile, they can simply be left there on the exported model.
There is one last thing to mention about
your UV layout, and that regards mirrored and overlapping UV's. It's long been a common practice to have
mirrored UV's that overlap for symmetrical body parts, this saves texture space
and also texturing time. But this
presents a problem with normal maps, often producing artifacts like
"inside-out" lighting when in-game. If
your game engine will not correct for mirrored UV's then you must give
everything it's own unique UV space. Also,
overlapping UV's should be moved outside the 1:1 UV square when baking your
normal map to avoid errors. To the left is one
of my UV layouts, notice the large UV "chunks", giving as few seams as possible. The red area indicates the main UV square,
the UV's outside of that square represent symmetrical areas of the model. They are offset by exactly 1.0, and since
UV's tile, they can simply be left there on the exported model.
TIP: In 3ds max's UV Editor menu, go to "select" -> "select overlapped faces". This is a very quick way to see all of your UV's that are overlapping and need fixing.
There are many programs, and some excellent free ones, that can create normal maps from a high poly model. So I will not be walking through a step-by-step process. Some programs are as easy as loading in your low and high poly model and clicking a button to generate the normal map. Others, like 3ds max, offer a bit more control, in the form of a "cage" that surrounds your model, which you can tweak to fine tune your normal map.
TIP: In 3ds max, I recommend doing a few test runs when creating your normal map. Once you are happy with your settings, go into your render settings and turn on "supersampling". This will greatly increase render time, but will smooth out all the jagged edges and pixilation in your normal map, making it look cleaner when applied to your model. Conversely, turn off supersampling to speed up render time when doing test runs!
Once you've generated your normal map, it's time to bring it into Photoshop. You'll want to get the excellent and free NVIDIA Photoshop plugin, which can be downloaded from NVIDIA's website.
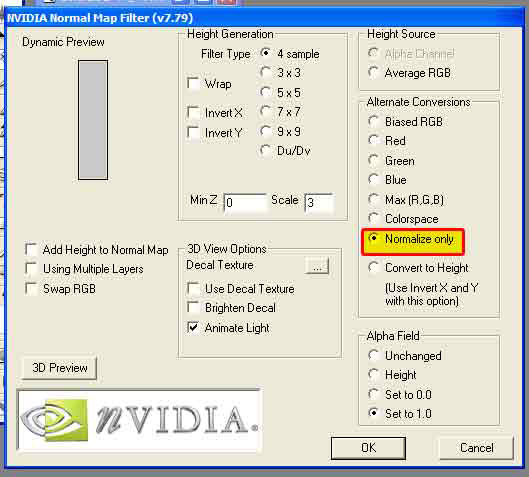
Apply your newly created normal map to your model, and have a look. More than likely you'll see a few spots on your model that don't look quite right, maybe there is a few holes, black spots, etc. Very rarely is your normal map perfect at this stage. So it's time to do some cleaning up in Photoshop. My most useful tools for cleaning up a normal map are the smudge tool and clone stamp tool. Use these tools to tidy things up, but before saving, you must run the NVIDIA filter first! Use these settings, this makes sure that the RGB channels add up to 1, which is necessary in a proper normal map.
You can also use the NVIDIA filter to overlay details that would be either too difficult or impossible to model conventionally. Any grayscale image will work, and you create it just like you would make a bump map: white is high and black is recessed.
 For this example, I wanted to give my
dwarf's wrist cuffs an engraved metal look, and it would have been time
consuming if not impossible to model this detail. So, I found an image I liked, desasturated
and inverted it, then ran the high-pass filter on it to even out the lighting. Then
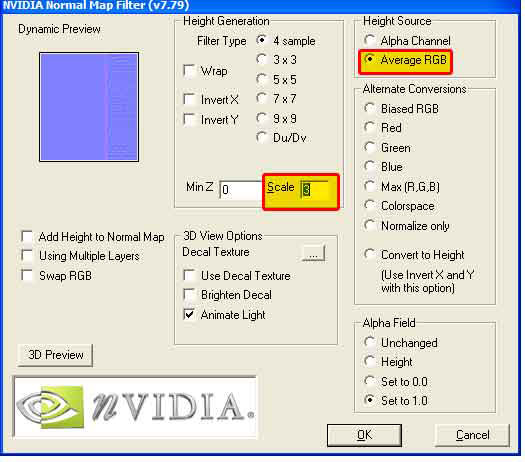
I played with the contrast to make it pop a little more. On the right you can see the progression of my overlay. On a new layer, once again run the NVIDA
filter with these settings.
For this example, I wanted to give my
dwarf's wrist cuffs an engraved metal look, and it would have been time
consuming if not impossible to model this detail. So, I found an image I liked, desasturated
and inverted it, then ran the high-pass filter on it to even out the lighting. Then
I played with the contrast to make it pop a little more. On the right you can see the progression of my overlay. On a new layer, once again run the NVIDA
filter with these settings.
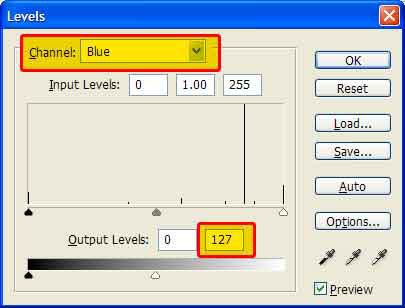
You can give the "scale" value any number you want, higher values will give more depth to the normal map. After running the filter, set the layer's blending mode to "overlay", then open up the levels menu by going to "adjustments" -> "levels". Set the output for the blue channel to 127 as shown here.
The picture below shows the affected portion of the normal map and the result on the model, where you can clearly see the engraving on the cuffs.

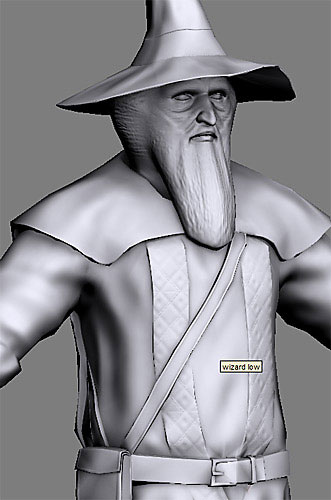
As you can see, the NVIDIA filter is extremely useful, and can be used for all sorts of things, so let your imagination run wild. In this untextured picture the NVIDIA filter was used to give the wizard deep wrinkles in the face, as well as cool looking embroidery on the robe. Just remember to run the NVIDIA filter with "normalize only" checked before saving out the final version of your normal map!
I hope you've enjoyed this series of character modeling articles, please send any questions / comments to [email protected]. You can download a complete PDF version of this article, with full-size screen shots from here (1.8 MB in size)
Dark Shader Video Preview
As work on Dark Shader progresses, we have prepared a video of some new features for you. Download the Dark Shader WMV Video (20 MB)
This video demonstrates several new shaders, including blend, glass and rainbow. It also covers full-screen shaders and direct code editing. Dark Shader will be available soon.
Bombzuka Game Review

The recent Retro Remakes Competition is always a great venue for new games. Bombzuka was Matt Pilzs submission, and it came in at a respectable 8th place (out of 76 entries), winning a Judges Spot Prize in the process.
Bombzuka is a faithful remake of the 16-bit classic Bombuzal by Image Works and accurately re-creates all of the 130 original levels! The game itself goes like this:
Bombzuka is a hardcore bomb technician at heart. What that means is that this 'cuddly' little creature spends all day and all night diffusing hazardous bombs and mines that he happens to come across as he leaps from one digital world to the next.
You star as Bombzuka and if you haven't guessed by now, your goal in the game is to strategically and carefully detonate each and every bomb/mine found within every level, while making sure to leave yourself a safe and secure standing place at the end!
Life isn't all that easy for Bombzuka, however. As he makes his way through each map to detonate the explosives, he is likely to encounter a series of hazards including enemies, dissolving platforms, spinners, teleports leading to places unknown, and so-on.

Detonate all of the bombs and mines before the time runs out while making sure to secure a safe spot to stand on at the end, and you will progress to the next world where more explosives await.
We've prepared a video of Bombzuka which can be watched here. You should definitely also visit the Bombzuka web site and grab the 20-page 'Behind the Scenes' PDF file, which documents the process of creating the game from start to finish, and is a fascinating read! We look forward with anticipation to Matts next game.
Bombzuka web site: http://www.m3dr.com/projects/bombzuka/
DBPro Tutorial - Extends XML - by Steve Vink

Managing Inventory through XML
XML is one of those buzz words you hear thrown around the Internet, generally in terms of business communications. XML is a very flexible mark-up language, which can be applied to virtually any collection of data, including your game assets. Using the Extends plugin, this tutorial will show you how to build an arsenal of game items, manage them efficiently and easily using XML, and incorporate them in your game.
Creating the Inventory File
The first step is to create an XML file containing the items we want to be available in our game. The table below shows these items, and some typical attributes you might want to apply to the assets.

This table is actually a screenshot from my XML editor, showing the code in a graphical format. Examining an individual item in XML, it looks like this:
<ITEM id="1">
<NAME>Invisibility</NAME>
<CLASS>Potion</CLASS>
<HEALTH>0</HEALTH>
<DAMAGE>0</DAMAGE>
<PROTECTION>1000</PROTECTION>
<USES>3</USES>
<WEIGHT>1</WEIGHT>
</ITEM>
You can open the items.xml file in a web browser in order to browse the contents.
Loading the items into DarkBASIC Professional
There are 2 approaches to take when accessing the XML data. The first is to simply load individual elements or collections of related data when they are needed. This is preferable when you have a lot of information. For example, you could hold map data for an entire world in an XML file. It would be inefficient and time-consuming to load all of this at once. In our example with just a small amount of data, and to simplify the exercise, we will load of all the items from the file together. Let's build up the code step by step, to see what is required.
Opening and closing the file
Each XML file needs to be opened to read, and requires a unique id. Afterwards, it must be closed.
` Open the items file
xmlItems = 1
Load XML "items.xml", xmlItems
` Close the items file
Delete XML 1
Counting the number of items to load
Extends allows you to count the number of "child" elements at the current level. It is worth noting at this point that we have a seemingly redundant entry at the top level, DBPRO. This is to make the file compliant with the XML standard, which only allows one top level entry. To count the number of items, we must drill down one level, and count the children from there.
` Count the number of Items in the file
xml node to child xmlItems, "ITEMS"
item_Count = xml child node count(xmlItems)
Now we have opened the file, navigated to the Items level and counted the number of child elements, we can load them into the program array. Again, there is more than one way to do this; we will opt to start at the first item, and keep moving to each one in turn until we have reached the maximum count. The process is as follows:
- Move to first item
- For each item:
- Go to first item property (XML child)
- Iterate through item properties (XML siblings)
- Return to Items level (XML parent)
In code it translates to the following:
` Move to first item
xml node to child xmlItems, 0
` Iterate through the items and record the values
for n = 0 to item_Count - 1
arrItems(n).id = val(get xml node attrib value(xmlItems))
xml node to child xmlItems, 0
` name
arrItems(n).name = get xml node value$(xmlItems)
r = next xml node(xmlItems)
` Class
arrItems(n).class = get xml node value$(xmlItems)
r = next xml node(xmlItems)
` Health
arrItems(n).health = get xml node value(xmlItems)
r = next xml node(xmlItems)
` damage
arrItems(n).damage = get xml node value(xmlItems)
r = next xml node(xmlItems)
` protection
arrItems(n).protection = get xml node value(xmlItems)
r = next xml node(xmlItems)
` uses
arrItems(n).uses = get xml node value(xmlItems)
r = next xml node(xmlItems)
` weight
arrItems(n).weight = get xml node value#(xmlItems)
` Back up one level to the Items level
xml node to parent xmlItems
r = next xml node(xmlItems)
next n
You can see the use here of various new commands:
Get XML node attrib value
Retrieves the value from inside an XML tag.
Get XML node value | value# | value$
These commands retrieve the values between the XML tags.
XML Node to Child | XML Node to Parent | Next XML Node
These three commands allow you to quickly navigate through the XML tree structure.
Putting it all together
Download, install and run the example code. You can see how the XML is opened; the items are accessed and loaded into the program, and subsequently displayed on screen. As you hover over the objects, their name and class, as retrieved from the XML file, are displayed.
Conclusion
In summary, using an XML file is a very simple process. Saving to the file follows the same rules and methods. It would be true to say that using XML to manage game assets is a good way to ensure your methods are logical, neat and easy to maintain.
It would be worthwhile reading up on XML and the standards before starting your first project. By adhering to the standards, you make your application compatible with other reading and editing programs and utilities. It also allows others to make modifications and enhancements using a universally acceptable language.
Until next time, happy coding!
Steve Vink
Community News Round-up
There were quite a few 'short' news items recently, so we collected them together here:
Odyssey Creators are go!
We are pleased to announce that our friend Frederic Cordier has completed the set-up of his new company, Odyssey-Creators. You visit his new website at: http://www.odyssey-creators.com
Odyssey-Creators is a small French company that will deveop and resell software such as X-Quad Editor, the game development software. Another part of their job is to translate to French some of The Game Creators tools to make them accessible to the French developer community. Within the next few days, the X-Quad Editor English evaluation version will be available for download and for those that like it, the registration process will also be available. Also on the drawing board is a brand new version of "3DMapEditor" to fit more to the DarkBASIC Professional technical specifications. eXtends plugin 1.3 for DarkBASIC Professional will also be released. Many new things and surprises will appear on the Odyssey-Creators website in the near future.
AGE
AGE is a free game maker with scripting, entities, billboards and multiplayer - all made in DBPro (though in fairness the multiplayer is done with Multisync and the collision with Sparky's plugin). More information on it and a handful of screens can be found at: http://devaug.com
Arvoch Conflict on GameSpy
Congratulations to SW3D Games for getting their premiere space combat sim, Arvoch Conflict, reviewed in GameSpy's "Download This" Issue 34. This quote from the review sums it up nicely: "There's so much to this game, you'll never experience it all in the mere hour of play the demo offers. Any gamer who's even partially interested in space combat owes it to him/herself to give Arvoch Conflict a whirl."
Multiple Key Press Article
This free in-depth article from Neil King explains all about the various aspects involved in detecting multiple key presses on PC keyboards in your games. It covers 'ghosting' and 'masking' and the hardware aspects of just what is going on under those keys. Take some time to read this, you'll thank him for it!
Lee's Tip of the Month - Pacer Counters
 The concept of nested counters in computer programs has been around since the start of the computer revolution, and was the primary substitute for floating point processing in the early 8-bit days.
Nesting counters today are still used when the programmer wants to keep their game logic fast and flexible, without relying on the use of floating point
variables. By way of a practical example, consider the ease of the following floating point code:
A# = A# + 0.1 : IF A# > 1.0 THEN PRINT "BANG"Now imagine you had no floating values, how could this effect be duplicated with integers only? There are a number of ways, the simplest is to scale up the values:
A = A+1 : IF A > 10 THEN PRINT "BANG"However, there is another way which involves the use of a second counter, which I like to call a pacer counter, and looks like this:
AP = AP + 1 : IF AP > 10 THEN AP = 0 : A = A + 1
IF A > 1 THEN PRINT "BANG"
The result of the code is the same, but now we do not have to change the condition of the last line to suit our choice of data types. The real benefit to be found using pacer counters is when you want to space out events in your game. A classic use of this is the bullet firing routine you might find yourself writing:
IF JOYSTICK FIRE()=1 THEN GOSUB _SHOOTGUNThe line above like looks fine, until you understand that it will fire the gun 60 times a second for as long as the fire button is pressed. It is likely you will want to slow this event down a little, which is where a pacer counter comes in:
IF JOYSTICK FIRE() = 1 AND PACER = 0 THEN PACER = 10 : GOSUB _SHOOTGUN
IF PACER > 0 THEN PACER = PACER - 1
As you can see, the gun can now only be fired if the pacer value is zero, and the pacer variable can only ever be zero once every ten cycles of the game loop. By changing '10' to a different value, you can speed up and slow down the rate of fire to suit your games needs.
From the Forums
Here we present more hot topics from our forum worth checking out ...
The TGC Web Ring
Web rings are a bit of a flashback to the 'old days' of the web, but they still serve their purpose in collecting together disparate sites on related topics. Check out this TGC forum related one.
Get the Present
What you mean Christmas is over?! Damn, this is such a cool looking game too. We are hoping that by mentioning it, it'll force them to release the English version soon :)
.
Another Christmas game!
Christmas is in the air.. or, at least it was when this game was written. Fly Santa, drop presents down chimneys and avoid the choppers shooting you down (yes, shooting down Santa, go figure.. perhaps some kind of over-worked elf backlash or something)
Crossword Maker
This program will take your word list (see the 2nd post down) and create a complete crossword grid from it. It's pretty cool, and while it doesn't write the clues for you, it does include the source code so you can ammend as needed.
.
Mini IDE for DarkBASIC
TDK has released his replacement IDE for DarkBASIC Classic. It's small, vey fast and .. well .. it just works. It's a proper Windows app and includes Project features similar to DBPro. Check it out.
TDK's Tutorials for Newcomers
TDK has also created masses of high quality tutorials. Covering vast tracts of subjects these are absolutely essential reading if you're new to coding, and damned useful even if you're not.
.
Dark GDK.NET Updates
For people who have purchased DarkGDK.NET, the latest update to the toolkit is now available via your Order History page. The update does not sort out the outstanding bugs for DGDK as yet since this is an on going process with Mike and several developers. It does however fix a number of problems that a few users experienced when first installing the toolkit.The DGDKSetup.exe runtime installer used for setting up an End-user's system has also been fixed to deal with the necessary prerequisite files for making everything work as it should. The help file has also been updated with numerous corrections pointed out by a few people, plus some additions to the DGDKSetup instructions page.
Also, a new sample demonstrating the shader functionality has been added to the toolkit to show how the shader files can be used to enhance your games and applications visually. And finally, some new functions have been added that are required by certain additional plugins.
ODE Physics for DarkGDK.NET
This is the official ODE Physics plugin for DarkGDK.NET. It is based upon the original DarkBASIC Professional ODE Physics plugin, but is fully compatable with DarkGDK.NET v1.0.6.0. (Important, please update your version of DarkGDK.NET to 1.0.6.0 before using this plugin)
The plugin comes with a small document detailing how to setup the plugin with your DarkGDK.NET applications. It also comes with a sample demonstrating the plugin n action. Ideal to get you started with physics behaviour in your DarkGDK.NET games and applications. More information can be found in the Dark GDK.NET ODE Forum thread.
Dark GDK.NET is on sale now starting at $60 (€45, £32) from this web page.
Tech Tips - 48 Hour Game - by Grant Clark

"Is it possible to write a simple, but otherwise full game in 48 hours using DarkBASIC Pro?" This is a question I have asked myself on several occasions, and just the other night I decided to give it a go.
Armed with my trusty copy of DBP 6.2b and my favourite media creation apps, I set about remaking missile command in a simplified but otherwise fully playable and challenging variant of the Atari classic. The reason for choosing this game was simple, I had half coded a version of it around a year ago and lost the gosub driven source, this 48 hour game would be mainly function driven and would also help me test some ideas for scaling weapon fire in a 3d environment for another game as a bonus. The main aim here was to make a game that had decent gameplay, provided a mounting per level challenge, saving of the high score and to have all the usual in between level bits with bonuses, game over and title screen just like a real arcade game would have. The only enemies in this version would be missiles. So in a condensed form, here's sort of how it all went.

First I prepared the environment for the game and laid down a basic framework that allowed me to progress from the title screen to game start, game play, level complete and all the other game 'parts' in a controlled manner. Once written this was tested to make sure I could get back to the title screen using scancodes to trigger virtual game events like 'life lost' and 'game over' etc.
Next I whipped up a landscape mesh in Bryce that seemed to fit the scene I had in my head, prepared a texture for it and exported it to .X format. This was done for the bases and launcher too. A little bit of pixel work was done on the font I wanted the day before for, another project to make it a true alpha channel affair, and a backdrop was reworked from an old space image I made some time ago. With models and image media in hand I could start building the simple scene that would hold the entire game.
Once All the graphical stuff was in place it was time to start coding the particle systems that drive arcade games, several of these would be needed for things like incoming missiles, your rocket fire and the explosions. Coding in the functions to control the systems was very simple with the only real issue being a discrepancy between the direction the Y coordinate systems used in screen-space and 3d world-space, and one other oddity that turned out to be me working backwards. but everything was easy to resolve. Much yayness abound after testing the weapons, it worked as expected and will be implemented in another game.
After coding the particle systems it was time to code the game logic, the stuff that controls the player, handles all the interactions and processes the collisions. This was more simple than first thought after finding a rather useful range finding function on the forum that uses vectors to compute 3d distance in what seems like an idiot proof manner (good thing for me then). Testing of this code was a lot of fun and resulted in some very strange happenings playing with values and logic arrangements. Once I was on top of the logic it was possible to actually play the game, so I did, and after each run I would tweak something in the code to get the feeling of the game a little better each time. It was at this point I noticed something I have not done for a long time, the source was totally void of remarks and documentation, but I was only going to be working on it for 48 hours so the source would remain familiar to me for the duration of development, I also name things in a certain way that seems to make sense to me, so I never really saw it as much of an issue, just unusual. The source is still uncommented but should be easy enough to follow.
With the game logic coded, it was time to debug the whole shebang to make sure it actually worked as it was supposed to, loopholes in your logic are pretty easy to find in such a simple game, but may only occur under certain conditions, so a bit of lateral thinking comes into play trying to get the game into situations you think it might fall over on, to test certain bits of logic in a certain way. Debugging this was nice and easy taking only a few runs to get right, this left lots of runs for me to actually get a feel for playing it properly and also gave me the chance to fine tune some elements of the game and get it feeling close to complete. Testing and tweaking actually takes up more time than you would think due to all the different scenarios you can find yourself in, the more complex the game, the more combinations of events you have to test. Thankfully testing and tweaking this game took around 4 hours to get right, some can take what seems like forever till the feel is spot on and it behaves properly. Just less than 36 hours in and we have a game that's properly playable but lacks audio, nice.
The sound requirement for a game like this is minimal, and you don't have to be too fussy considering the original games from this era used noise generators for the explosions and other sound effects, so the sound for this game game was not really an issue . If getting arcade game sounds is prooving to be difficult you should check out 'orangator', it's a freeware virtual synth system that lets you make great sounds that can be saved as .WAV for use in your games or further processing, its pretty powerful and better suited to making game sounds rather than making music. Google it and find your copy!!
 The time of reckoning has arrived, the game appears to work properly and the sounds have been added, now its time for the final play test session and the last of the adjustments and tweaks. This is the point where you try not to break the code by shoe-horning in a late addition or two that you came up with on a whim, along with the final tweakage. After an hour or so messing around with the game and tweaking, I decided to see what level I could reach. Level 6 on the first 'real' go might seem a bit high, but considering the fact I had played a few hours of the game in total in various states, this seemed reasonable as I had already played 'forced' higher levels and it gets pretty hard before too long. It was decided that the 48 hour game was finished with just under 5 hours still left on the clock. I'm tempted to update the code at some point in the near future, adding extra things to the game should be a fairly easy and speedy process. (late addition, I found the original gosub source, and the explosions have much more POP to them, so I must update this game with those explosions.)
So back to the question at hand, can you make a simple but otherwise complete game using DBP in 48 hours? If you are a half decent DBP coder who can get on with the job at hand, then the answer is a resounding YES, newer coders should be able to pull off a game like this in about a week or so. Using some of the better plugins, games like this could be constructed a bit faster / easier as you'd need less code for some of the parts.
Next time you have a boring weekend coming up, thrash out a 48 hour game of your own and release it on the forum for us all to have a play. In the download you'll find the game to play and the source with media to prod / poke / laugh at, have fun and take care with those rockets, you'll have someone's eye out.
Cheers, Grant.
Download Re-Command, Grant's 48 hour DBPro game (5.7 MB)Rich swaps game making for cheese makers!
 After over four highly successful years creating and editing the TGC newsletter, Rich has decided to leave the TGC team and head over to Aardman Animations. January is Rich's last working month and we wish him well in his new role at Aardman.
Rich has been a great team member of TGC and we will miss him dearly. He still plans to be involved with the community and also wants to work freelance for us from time to time.
I thank you Rich for all your hard work, the web site, the back-end order system and the support system are fantastic tools - the TGC team use them every day and they save us lots of time. You have been a leading figure on the forums and always have a positive response to the many issues raised around our product range. I hope you can keep involved as I believe you have plenty to offer and we'd miss your memorable quotes!
Good luck and thanks for all your dedicated hard work.
Rick, Lee and the rest of the TGC Team.
PlayBasic News by Kevin Picone

Well, it's hard not to feel a little retrospective as another year comes to a screaming conclusion. As I pick over the additions of 2006, it's been the year where PlayBasic has been quietly blossoming. The growth hasn't merely been caused throwing more commands into the mix. Even though there's been a 350 plus command growth this past year. But a lot of effort has been focused across the package Debugger, Help, Tools, Examples etc and upon the core language. Which
has quietly been evolving into a more powerful, more modern take on what is procedural basic in 2006.
While language features might not make for glamorous screen shots, at the end of the day, the development of programs comes down to the flexibly of the language. Improving this flexibly allows a programmer to more easily turn their investment of time, into more productive programs. Nobody wants to waste effort reinventing the wheel for missing constructs. That's not to say that Graphic's are not important to us though, they certainly are! We've certainly invested a
healthy amount of time already in our current and next generation solutions. But our main objective is that PlayBasic should strive to solve the whole problem and not just select parts of it.
Linked Type Lists
This addition carries on from where the previous type improvements left off. Recent changes allowed typed variables/arrays to contain a collections of different user defined types. So arrays/variables can contain not only the parent type, but any descendant types also. This allows you to store all of your various types in the one array if you like. Now while PB includes various array commands to help search/resize arrays for you, an array is not always the most convenient structure to hold a list in. Enter the linked list.
Currently Link List support is only embedded into typed variables. Effectively what it allows you to do is house a chain create objects inside a list. Now unlike using an array, where you'd explicitly need to keep address the objects within the list, PB link lists hides that away for you. So rather than indexing, so you control an invisible list pointer. This pointer can be reset, stepped forward etc. This allows you to walk through lists of object and you never have to concern yourself with the size of the list, or element it all happens transparently.
You can step through lists in two ways, manually or automatically using the FOR EACH control loop. For each, is a variation of the FOR/NEXT loop, which you're no doubt already familiar with. The only difference really is that for each is design to work with Linked Lists. So i.e. The following would process all the items in the MYObjects() list
For Each MyObjects()
     DrawObject MyObject()
Next
You could also do this manually using a Repeat/Until or While/EndWhile if you like.
What Will 2007 bring ? = VM2 & FX and a bottle of rum!
The most regrettable things about 2006 has been the need to delay PBFX again. The delay is a direct result to our continued commitment, well desire, to keep PB + PBFX a combination product! In other words, it's two products based upon the same common frame work. Unfortunately this represents a fair slab of work to get everything to a releasable point. (Ie. Compiler, Runtimes, IDE & Doc's are all upgraded!). The benefit is that it will far easier to maintain them in the future.
Building from modular base allows us embrace new technologies easier. The alternative would be to build special editions of the entire package for new OS + GFX api's i.e. Vista + DX10. Which would be nightmare in terms of support! This is one area where our definition of FX, has indeed been changing as Vista approaches. While we won't be jumping ship immediately, we are planning to release a Vista/DX10 module for PBFX. This will allow PBFX users to product DX9/DX10
editions of their applications almost at will.
Currently we're pressing through our Compiler/Runtime(vm2) upgrades, as you've most likely already noticed. Many of these features are being brought forward from the V2.00 (FX) design. It's important but tedious work, as this base represents the core technology that all future PB products will share. While the road is nearing completion, we've still a few hurdles left to tackle. Once we can knock them over, we can officially switch everything over and then focus on the
modules (ie. FX, 3D).
This is our absolute priority in 2007!
PB 1.61 is Out there!
Well, that's enough for this month. The PB v1.61 patch is available for download (from TGC + UW) at the time of writing. I wish you all the best in 2007.
PlayBasic is on sale now from //www.thegamecreators.com
This months Winner
Each month we pluck one lucky subscriber from the newsletter mailing list and award them a free copy of DarkBASIC Professional. The email address of this months winner is: byerty@???.??.com. If this is you then send us an email to claim your prize.
Outro
Share your news with over 13,500 active games developers!
If you have something you'd like featured in a future issue then please get in touch and include as much information as possible (including where applicable: screen shots, URLs and zip files).
Issue 49 deadline - January 29th.