If you cannot view this newsletter correctly, click here to view it online

Editorial

Hello again,
Welcome to a belated May newsletter. So much has been happening here at TheGameCreators that we've pushed the newsletter deadline back so that we can report on our breaking news for this month.
We've finally reached where we want to be and feel that this is one of the most exciting months at TheGameCreators for some time, with lots of projects making major leaps forward.
Most of my time since we last spoke has been spent on supporting many of our flagship projects, leaving little time for my own personal side work, although I did find some to flesh out a new AppGameKit 2 project that a friend and I are planning, and I hope to bring you news of that in maybe a couple of months.
On a non-related note, I was rather suprised to find myself recently without electrictiy following a snow storm in the middle of May! Which just goes to show, you can't predicte anything. I was going to share an image with you, but as quickly as it arrived, the snow melted, so maybe next time. :).
So, that said, let's move forward and see what's been happening here at TheGameCreators.
Dave Hawkins.
contents
(1) GameGuru (2) Store news (3) Great Outdoors (4) AppGameKit 2 (5) AppGameKit Tutorial (6) Stick Orbs (8) YouTube (9) Keep up to date
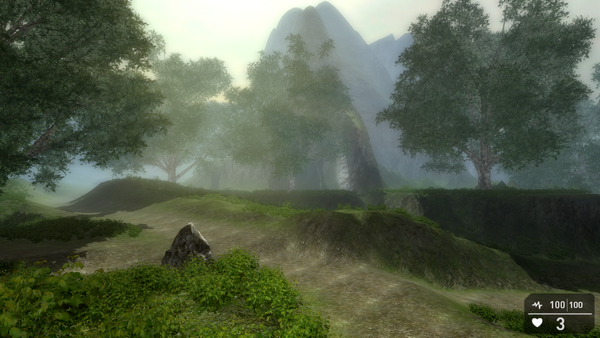
GameGuru
![]()
GameGuru has seen a lot of changes recently, with lots of new and exciting features & tweaks in the last few weeks. This has all been leading up to a major milestone in the GameGuru development process and we're pleased to annouce the very first full release, taking GameGuru out of Steam Early Access and firmly into version 1.01.
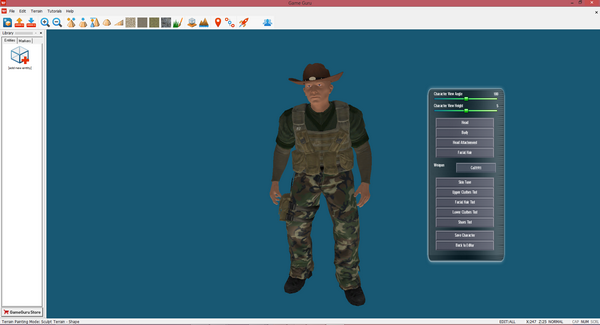
Version 1.01 is a big leap forward, even from the latest early access release and introduces many improved editor features, including the much requested character creator, a great new tool that enables you to design your own characters and quickly and easily add them to you own games. We supply you with some templates to get you started and will be making more choices available as we continue to improve and expand GameGuru.
Please don't worry about us coming out of Early Access. We are 100% committed to GameGuru and have long term plans to expand and improve it. We felt it was the right time to come out of Early Access and to start promoting GameGuru as a complete game maker. You can be sure we'll be releasing regular updates just like we've done since we launched on Steam earlier this year.
Third Person Gaming!
Today we're also introducing a new perpective to GameGuru - adding support for 3rd person to the existing 1st person view. You can gain access to the first example of this mode in a new Fantasy DLC pack that features a special character that has all the necessary animations for third person gaming.
If you're one of the original FPSC Reloaded backers you will be able to access this pack as part of the pledger deal. We expect to see a lot of artists also taking advantage of this new system, turning their talents to adding 3rd person content to the store.
As you can see from the above screenshot, version 1.01 also introduces a brand new decal system, with these new animating effects it will allow game makers to immerse their players even further into their games. We're providing 20 decals from a mix of genres to get you started, you can also find many more in a new range of Mega Pack DLCs that are released today.
Tutorial System
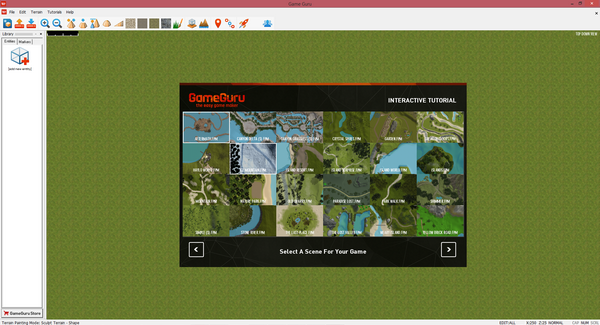
We've also taken the opportunity to introduce a very helpful interactive tutorial system to help new users get started with GameGuru. Over time we plan to expand the tutorials this system can provide. We've also included 24 environmental maps to kickstart your game creation - these maps come from our talented communtity and are a great place to start.
New DLC available!
In addition to all the exciting development news we've released six DLC media packs, providing users with an opportunity to add a huge mix of updated legacy and new media to their collections. These packs are available on Steam and the great news is that orginal pledgers of project (when it was FPSC Reloaded) are able to choose 1 or more of these packs for free as part of their pledger deal. 4 Packs for Gold pledgers, 2 for silver and 1 for bronze pledgers.
To claim your DLC(s);
1. Log in to the GameGuru website
2. Click on the Account button top right
3. If you have a pledge then you will see this box of the right hand side;
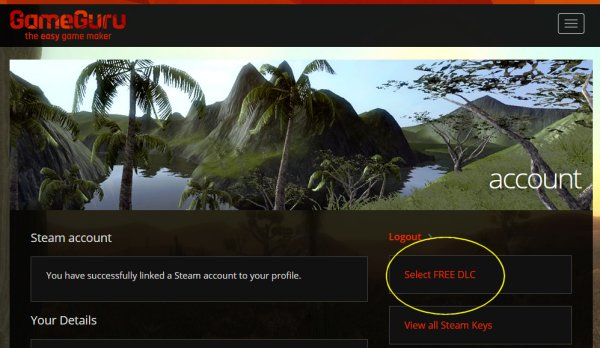
4. Click the link to choose which DLCs you want.
5. Once selected and approved, your Steam keys will then show up in TheGameCreators My Account area.
Here's a breakdown of the six DLC packs;
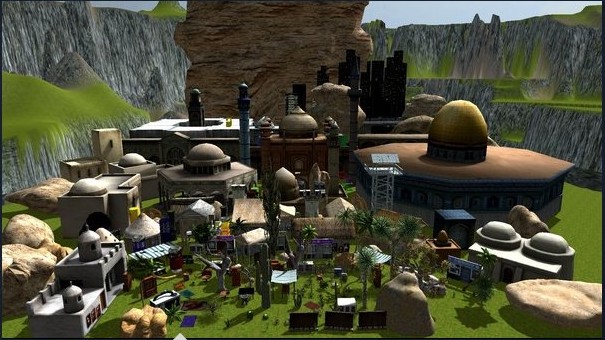
Mega Pack 01 - Expands on a range of desert and jungle assets, medieval middle eastern buildings and urban future styled media.
Mega Pack 02 - Focuses on dungeons, caves and catacombs and introduces a large amount of media to bring your dark interiors to life.
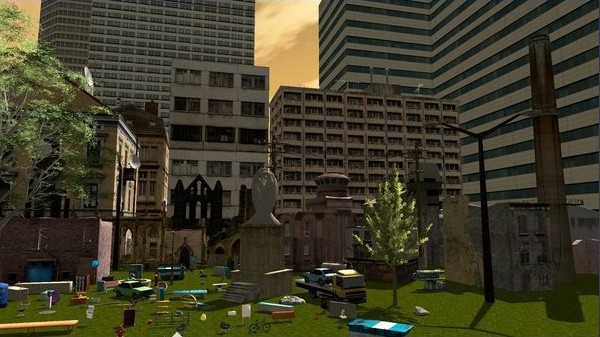
Mega Pack 03 - This is the pack for you if you're looking to build modern day urban streets, industrial scenes, warzones, or simply need a lot of modern day set dressing.
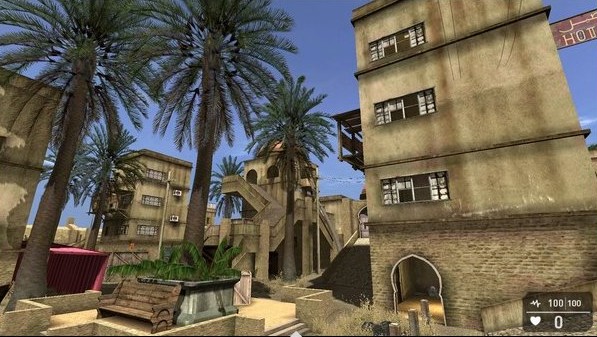
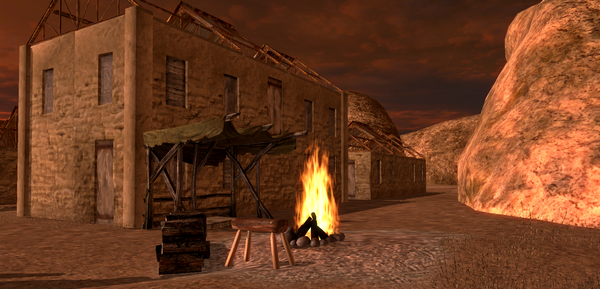
Death Valley - Increases the range of modern day middle eastern media, and is compatable with the default buildings, allowing you to expand your scenes. You'll also find 8 new modern day combat characters and a selection of scenic items.

Buildings Pack - Expand your range of buildings with this eclectic range of modern day and far eastern themed media.
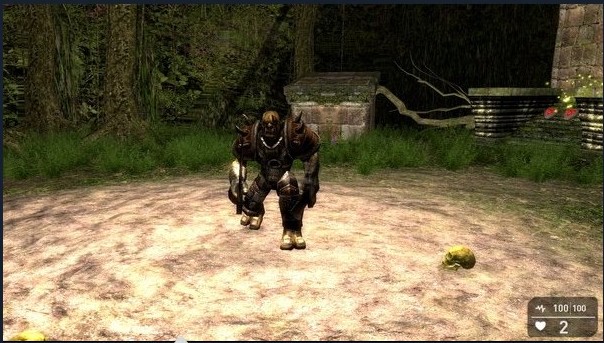
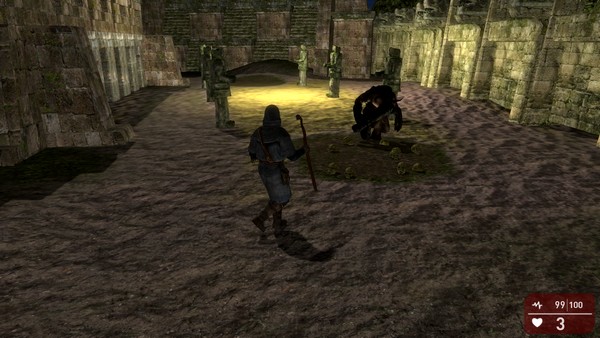
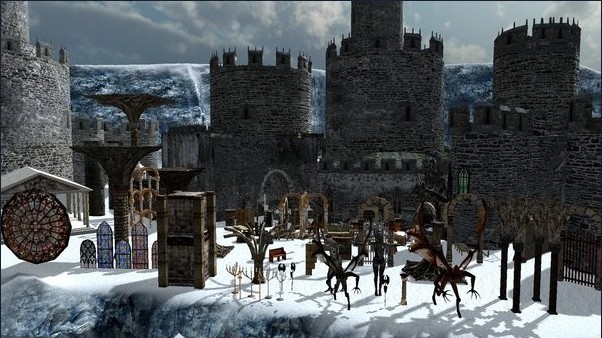
Fantasy Pack - This exciting pack not only introduces a new media style with an Incan, Aztec theme but is the first pack to fully support 3rd person with our first fully GameGuru compatable 3rd person character.
GameGuru Store
Another update on the latest GameGuru store uploads, and there have been a number of high quality additions this month.
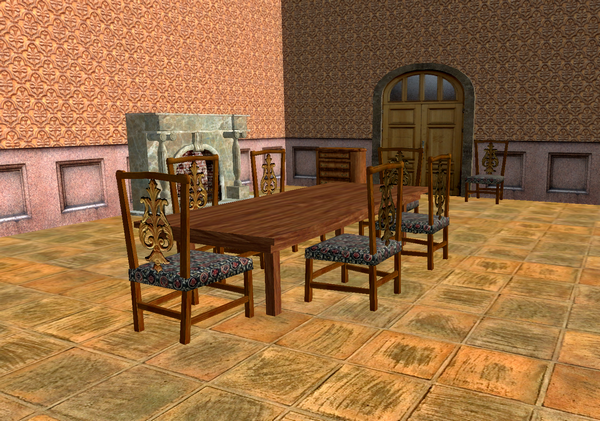
Artist BSP has added to his range of WW2 media with a great interior system. Fully AI compatable, this great value WW2 Pack includes a selection of walls, floor, ceilings, doors and windows allowing game developers to create realistic interiors for their games.
The image below includes walls, floors and a door from this pack as well as a selection of media from the artists WW2 furniture pack
TheGameCreators have released a new Sky Pack to the store.

The Great Outdoor Competition Results
We're sure many users will remember that last month we ran a competition to create some outdoor levels offering prices of between $50 and $100 for the winning entries. As it turns out we felt the standard was good enough for us to award everyone who entered a prize! So, congratulations to all of you who entered, we'll be sending the prizes to you this week via Paypal.
In addition to awarding the cash prizes, we also shortlisted 24 maps to be included in GameGuru V1 as part of the tutorial system, and also to help new users by providing them with a core map to get their games underway.
If you're a GameGuru owner you will gain access to these maps in the new build out on Steam today.
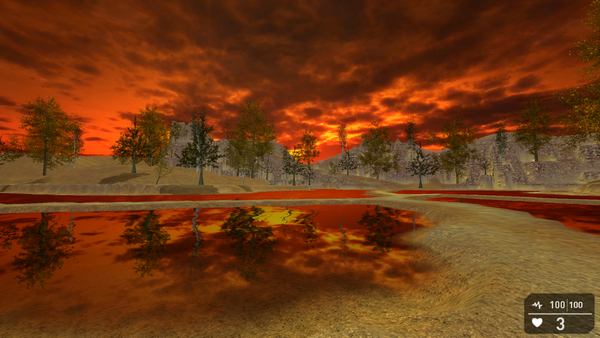
Aftermath - one of the competition winners.
Shimmer, another competition winner, which also provides users with an excellent custom terrain.
AppGameKit 2 news

V2.0.14 released!
Development work continues on AppGameKit and we're excited to annouce another update this month. This release includes fixes, tweaks and some added functionality. We're sure you'll be pleased with the improvements and we're listening for any feedback you have on this new release which is available on the TheGameCreators site and on Steam.
What's new in AppGameKit 2?
- Fixed LoadSpriteShader(filename) without specifying an ID not using the correct vertex shader
- Added a check for development profiles in the IPA export, use AdHoc or Store profiles instead
- Fixed error about missing file or directory when exporting Amazon or Ouya APK
- Fixed iOS export with the advert box unticked not removing the advertising identifier (IDFA) from the app
- CreateMemblock command will now zero the memblock during creation
- Added GetSpriteScaleX() and GetSpriteScaleY()
- Added WriteString2 and ReadString2 that use a faster method of reading strings from a file
- Added Spriter Pro support with LoadSkeleton2DFromSpriterFile()
- Fixed SetScissor generating a warning in the debug log window
- Added ability to loop an animation a specified number of times with a loop count greater than 1
- Fixed a bug where drawing more than 12000 sprites that share the same image could end up drawing nothing
- Fixed crash if an item is deleted that is currently being tweened
- Fixed GetResumed not being called on iOS after the app goes to sleep for the first time
- Updated iOS AdMob SDK to 7.2.1 which fixes a black screen after showing a full screen ad
- Updated Android Google Play Services (which includes the AdMob SDK) to 7.3
- Fixed Android not caching a full screen AdMob ad before the first call to CreateFullscreenAdvert
- Fixed switching edit boxes on Android sometimes hiding the keyboard for the new edit box
- Enabled copying of debug variable values using Ctrl-C on a selected row in the Variables window
- Enabled copying of debug log text using Ctrl-C on a selected row in the Debug Log window
- Fixed ResetTimer not resetting to exactly 0 on some platforms
- Fixed DrawBox command sometimes producing boxes that aren't perfectly straight
- Fixed not being able to stop broadcasting if the app generated a lot of warnings while running
We're now starting the development work to extend the 3D commands for AppGameKit!
AppGameKit Mastery - Is There Anybody Out There?

by Steve Vink
As with all of the tutorials in this series, the code created for this tutorial can be simply dropped into your project with the addition of the #include statement, and used immediately in your project. The driving force behind the series is simple: Beginners can drop the code into a project and use it immediately. Intermediate users can analyse the code, learn new methods and concepts, and ultimately modify and enhance the modules. Advanced users can jump on the forums and discuss the many different ways to achieve the same outcome, enhancing all of our knowledge and expertise within the AppGameKit community!
![]()
You should download the code prior to reading the tutorials, as you will need to refer to the functions involved.
First Steps in Networking
Last month we looked at multi-language apps, ensuring that the user interface was understandable by all. This month we'll look at a different kind of communication - device to device. It is a topic that many find daunting but this tutorial aims to dispel the intrepidation around this topic, and make it part of your everyday coding.
There are three important points to bear in mind as we progress through the tutorial.
- Firstly we will only be writing one program. This program will be capable of acting as both the host and a client. This obviously means that in our network we only have one codebase to maintain and distribute.
- Secondly, it is important to realise that we do not need to be concerned with synchronising the message sending and receiving. There are some clever pieces of code ticking away in the AppGameKit engine to perform the handshaking and transfer of data. But from our elevated view of the network, we will create a system that allows us to send messages and then continue processing without waiting for confirmation from other sources. Likewise, we can check for new messages at any time we choose.
- Thirdly, although there are commands to receive different data types, and multiple variables in one message, we are going to simply receive one string in each message. Because this is a generic solution, we will perform our own message construction and parsing, using the commands already available in AppGameKit.
At the end of the tutorial, you will understand how to achieve the following simple scenario shown in this video:
There are a small number of functions we need to achieve the outcome:
Creating the Network and Establishing the host. This is necessary for all communications to begin life. The first device needs to perform this step. Once established, the host can be treated like all other clients.
Adding clients. After the host has initiated the network, all subsequent participants join as clients.
Checking for messages. Each client must check periodically for new messages being transmitted from other devices on the network.
Sending messages. In order to facilitate 2-way communication, each client also needs to be capable of sending messages.
Putting it all Together
You can examine the code in the networking module if you wish, but as always it is ready to run immediately. A basic program has been created that starts with 2 buttons - Host and Client. Behind these buttons we will add a call to the relevant functions. For the Host:
CommsCreateHost()
For the Client we will add:
CommsJoinNetwork()
In this tutorial we have kept things very simple,and thus the network, host and client names are all hardcoded. In a more complex environment you might choose to be more dynamic with the naming of each entity.
The second screen is a panel of 6 buttons, either requesting that a note is played, or that the screen colour is changed. The commands behind the button clicks call the following command, with differing string parameters:
CommsSendMessage("NOTE:C")
This is all that is required to send a message to all other clients on the network. The code within this function is not that much more complex, consisiting of only three lines of code.
Now each member of the network simply needs to listen for messages being sent:
CommsReceiveMessage()
Each time this is called, we will reset the message counter and receive any outstanding messages. There may be none, one or many messages. For this reason we use:
count = CommsMessageCount()
to check how many messages need to be processed. Then we can simply receive each message and process it. In this small loop, we receive the message and use GetStringToken() to extract each piece of data. We are sending simple messages with 2 parts, here are 2 examples:
NOTE:C
COLOUR:R
Here is the basic code:
 for n = 1 to CommsMessageCount()
   // Get the message type by retrieving the first token
   message$ = CommsGetMessage(n)
   msgType$ = GetStringToken(message$,":",1)
   //Process each message here
next n
From this point you can read the code to see how a couple of SELECT and CASE constructs are used to manage each individual message and carry out the commands accordingly.
Summary
We have already reached the end of the tutorial, it really is that simple! You are now ready to create games that can communicate on a local network, and with only a little extra effort you can venture out onto the internet. Please use the forums to share your ideas and extensions to this code to help the wider community.
If you haven't already done so, download the code now.
![]()
I highly recommend downloading the latest update of AppGameKit and use the debugger to step through the code. It is available from version 2.0.12 (current version 2.0.13) and is an ideal way to watch the code in action!
Until next time,
Happy Coding!
Sticky Orbs released
AppGameKit developer Kennith Bugeja has create a puzzle game called Sticky Orbs and released it easily across multiple app stores thanks to AppGameKit's write once and deploy methodology. We've asked Kennith to write about his experience in creating the game;
Sticky Orbs has been over a year in development and went through a number of iterations. The concept and initial prototyping was done using Tier 1 (AppGameKit BASIC), making it faster to add/remove/try ideas. When the basic gameplay was more or less defined, I then moved everything to Tier 2 (C++), for the actual development. Sticky Orbs is also one of the first games to be funded by the Malta Digital Games Fund which aims at supporting the development of digital game start-ups.

TheGameCreators YouTube Channel
 TheGameCreators YouTube Channel is still going strong with over four years of content to browse and view:
- Over 170 videos!
- Over 900,000 views!
- Over 2,700 subscribers!
![]() Take a look at our channel now, and make sure you hit the subscribe button to stay up to date with new video uploads. Very often you'll get advanced previews of upcoming news.
Take a look at our channel now, and make sure you hit the subscribe button to stay up to date with new video uploads. Very often you'll get advanced previews of upcoming news.
We've also create a new GameGuru channel to focus on GameGuru tutorials and gameplay. You can access it here.
TheGameCreators on Facebook & Google+
![]() Join over 6,600 fans on TGC's Facebook page to keep bang up to date on news, user projects from the forums and discussions.
Join over 6,600 fans on TGC's Facebook page to keep bang up to date on news, user projects from the forums and discussions.
We're keen to hear from all our avid users and we always love to hear what you've been up to with the tools we sell. So if you have something you want to share with the wider TGC audience why not post it into the TGC Facebook page?
GameGuru
 GameGuru has it's own Facebook page now. Whether you simply want to see the update and progress news as it is released, or get involved in technical discussions about LOD, Light and lots of other topics, sign up to this page today to be part of it.
AppGameKit
You can join in the Facebook discussions in our AppGameKit group page with over 650 members and we also have an AppGameKit Facebook page.
Google+
You can also follow our products on Google+
"Computers make excellent and efficient servants, but I have no wish to serve under them" - Mr Spock