
editorial / june 06

Welcome to Issue 41 of our newsletter. The month of May was a pretty exciting one, both for the company and me personally. TGC saw the release of the excellent Dark A.I. product, and the continued development and refinement of Dark Physics. And I saw the release of my son, after he'd been inside for 9 months :) Many thanks to those of you who sent kind words and wishes to my wife and I. Apologies in advance if this newsletter is a bit scattered, so is my sleeping schedule right now :)
There are no less than 3 competitions you can get involved in this month. The first being a mini Dark A.I. compo, the second being the monster sized Retro Remakes 2006 affair, and the final one being a Text Adventure compo. So there is plenty to choose from if you are feeling in a competitive coding mood.
There are some top looking games this issue too. Gem Towers (our cover game) is a solid puzzler at its heart, and we've an exclusive video and screen shots from the new Starwraith game - the Arvoch Conflict. This game, created entirely in DarkBASIC Classic, is a testament to the enduring success of both the developers and the language. While we're talking about success - congratulations to Grant for having SubSurface appear on the PC Gamer DVD this month, a quality little shooter that deserved some attention. Finally check out the 'Forums' section this month for a preview of the new Firewall 2 game, how superb does that look?!
Hopefully next month I will be able to tell you that Dark Physics is out :) But until that time you'll have to make do with the sneak peak article we've got this issue. That and the ramblings of the beta test group, who appear to be pushing it harder than ever before and creating some truly great games and demos with it. Personally I feel that Dark Physics is the most important release we've ever made for DBPro. It will give everyone the ability to create games they never would have attempted, or allow them to breathe new life into old gaming genres. It's exciting stuff, with massive potential, and on the back of the vastly superior Upgrade 6 release for DBPro, it is a solid combination.
Don't forget you can read this newsletter online via your web browser, which is a much nicer experience if you are stuck within the realms of Hotmail or Gmail. See you next month for issue 42, but now I have to go change a nappy. Oh the joys :)
Cheers — Rich
contents
(1) Dark A.I. Released (2) Dark Physics News (3) Ultimate DBPro Pack (4) Arvoch Conflict (5) Retro Remakes 2006 (6) Gem Towers (7) Text Adventure Compo (8) DBPro Mastery (Vertex Manipulation) (9) From the Forums (10) FPS Creator News (11) DB Games.com (12) UK Convention (13) DBPro Tech Tips (Arcade Environments 2) (14) The Winner (15) Outro
Dark A.I. is Released

We have released a Dark A.I. 3D demo showcasing just some of the Dark A.I. features, wrapped up in an FPS style interactive walk-thru. This demo requires DirectX 9.0c Feb 2006 Edition (the same version as DarkBASIC Professional requires). It includes the full source code, so you can inspect the Dark A.I. commands for yourself (to compile the code and make your own changes you must own the Enhancement Pack, or remove the Enhanced commands from the code.) If your video card supports it, Pixel Shader 2 effects are used. The demo can run in 800x600 full-screen exclusive (recommended for slow / older PCs) or at the native Windows desktop resolution.
Download the Dark A.I. 3D Demo (36MB)
We have also produced a video of this 3D demo, which is a quarter of the file size, so more suitable to those on a slow connection. You can download either a WMV (Windows Media) version - dark_ai_med.wmv (11MB), or a MOV (QuickTime) version - dark_ai_med.mov (8MB).
Dark A.I. is on sale now, ready for immediate delivery, and costs $44.99, €34.99, £23.99. It is also available in a special money saving bundle pack with the forth-coming Dark Physics, saving you 15%.
Dark A.I. Competition
To celebrate the launch of Dark A.I. we have thrown down the gauntlet to all early adopters of this technology, by way of a competition. There are three prizes up for grabs which will be awarded as follows:
1st Prize: An ATI Radeon X800XL graphics card + Dark Physics
2nd Prize: An ATI Radeon X700 Pro graphics card + Dark Physics
3rd Prize: Dark Physics
Our standard rules apply (please see the forum thread we created for further details). The closing date of the competition is the 31st of July 2006. You are free to submit your entry before then.
Your entry will be posted online when the competition is over, and then the community will download and vote for their first, second and third favourite submissions. We may also use your demo to promote the Dark A.I. product in magazines, online and in our own compilations.
The judging criteria is thus very simple. Impress the community with a Dark A.I. demo that not only beats the official demonstration, but runs rings around it. It could be a walk-thru demo or a game, it is up to you. You will be awarded for the 'wow factor' you bring to your work, and the community will be the harshest judges you are every likely to find :)
Full details can be found here. Forum registration (and Dark A.I. ownership) is required to enter.
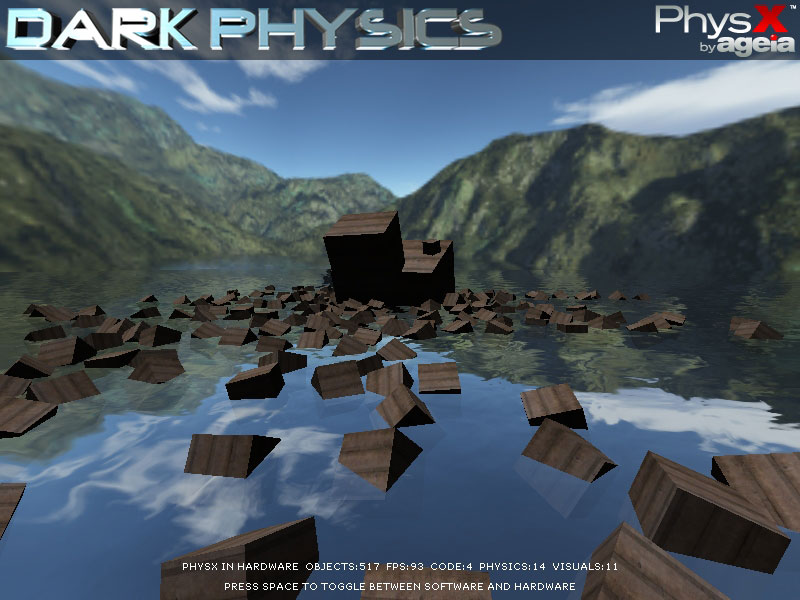
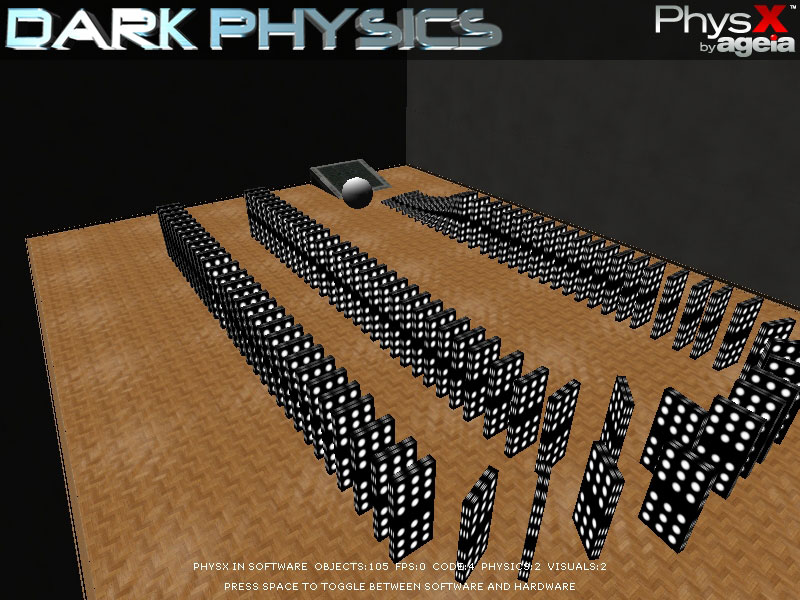
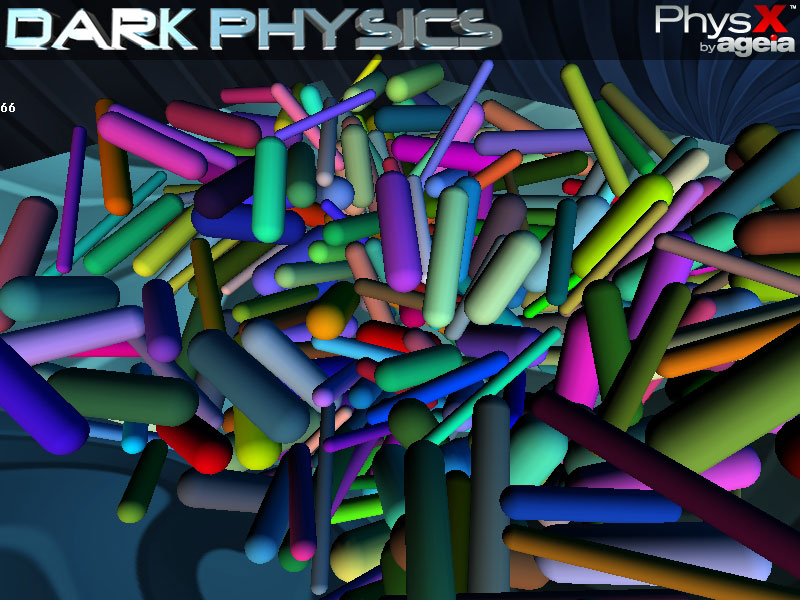
Dark Physics Sneak Peek 2

Over the past few weeks Dark Physics has undergone testing by a small group of dedicated testers. As a result of their valuable feedback we have made numerous changes to Dark Physics that has helped to enhance it in significant ways, and while this has affected the release date, the time spent making these changes has been very worthwhile.
Demos
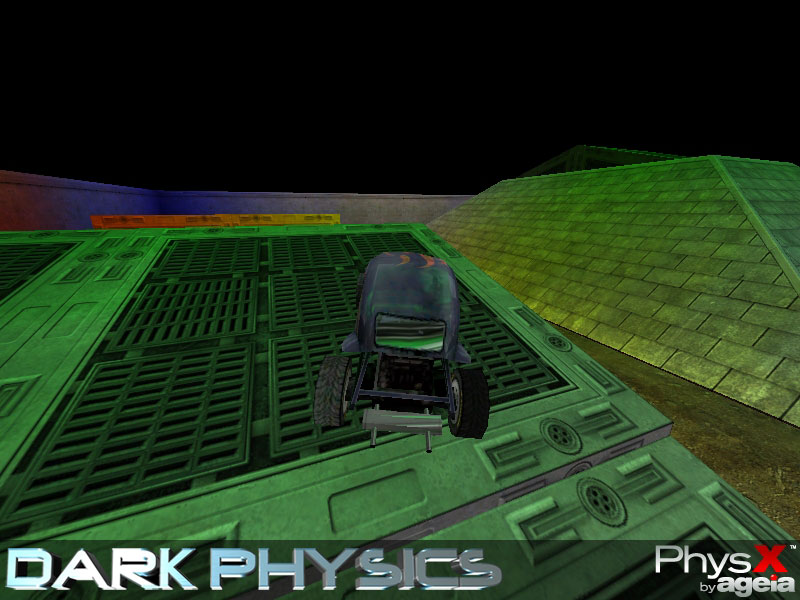
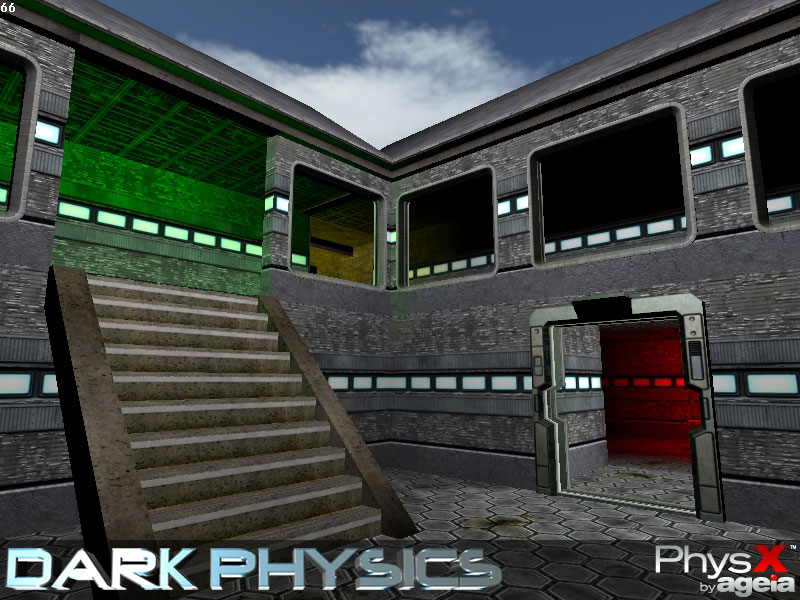
One of the areas that we had to look at was the demonstration programs provided with Dark Physics. Over time the amount of demos has increased to over 75 with each one showing how to use a specific set of commands going from the basics of using physics into more complex areas such as using joints to construct machinery. Highlights include showing buoyancy, how to make a bridge out of joints, walking around a level from FPS Creator with a few simple lines of code, a stunt arena to drive a car around, a complete arcade game and many more.
Documentation
Work has also taken place on editing the documentation and providing even more information. The documentation is broken down into several sections:

1) The Getting Started section provides an introduction into Dark Physics and guides you through your first Dark Physics program. It then goes on to explain the main components of a Dark Physics program and then demonstrates how to add objects into the simulation and finally a tutorial on how to use multiple rigid bodies.
2) The next section provides detailed coverage of rigid bodies explaining what types are available, how to create them, how to use rigid bodies, how to remove them, what properties are available and how you can control them, materials and how they affect rigid bodies and last of all a section on how to extract collision data.
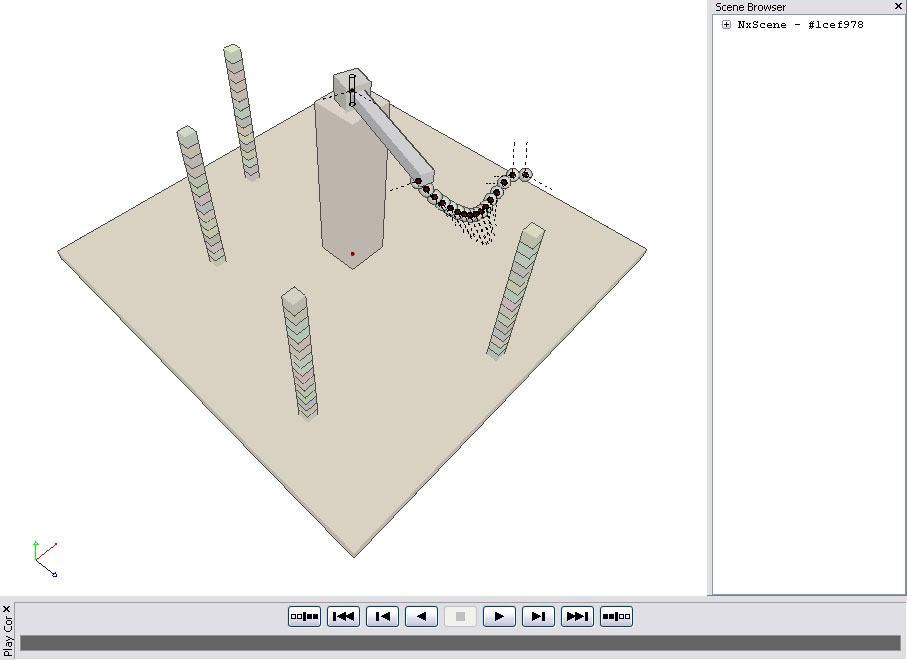
3) The Joints section of Dark Physics provides a powerful set of commands for modeling all kinds of machinery and structures. Joint types include sphere, revolute, prismatic, cylindrical, fixed, distance, point in plane, point on line, pulley and 6 degrees of freedom joint. Full explanations of what joints are is included along with a tutorial on how to use each type of joint.
4) The Character Controller command set is a good solution to use when it comes to having characters walk around levels. With a few simple lines of code you can be walking around a complex level with full collision. This section of the documentation explains the different options available when using character controllers and demonstrates how to use the commands.
5) Ray casting is useful for many different circumstances and a detailed tutorial is provided explaining how the commands can be used.
6) The Trigger command set is used to set off events for example a trigger can be used to implement an automatic door opening when a character approaches. Again as with the other sections a tutorial is provided demonstrating how to use the commands.
7) Moving onto the Particles section we have pages covering an introduction to particles, creating emitters, setting emitter properties, using pre built emitters and a section outlining possible technical issues which is helpful to understand some of the workings behind particles.
8) In the Cloth section of the documentation we cover how to create a cloth object, how to set its properties, how to attach it to other objects, explains other features such as ray casting and applying forces, explains how to use cloth to make flags and banners and how they are attached to other objects and again a technical section is provided.
9) The Vehicle commands provided with Dark Physics allow you to create four wheeled vehicles and offers a great deal of flexibility to allow for the creation of all kinds of scenarios such as driving simulations and racing games. A full overview of vehicles is provided along with how to create vehicles, how to add components, how to set properties and finally an explanation of automatic and manual driving.
10) The Fluid commands allow you to create fluid blobs or emitters and sections are included detailing how to create these and how to set their properties to affect their behaviour.
11) The PhysX area of the documentation provides further details about the AGEIA PhysX processor and how this can be utilised with Dark Physics to enhance gameplay and offer more power to your games.
12) The Advanced section of the documentation explains about topics such as simulation timing, skin width, solver accuracy, collision interactions and more.
13) The Tutorial section contains a collection of programs demonstrating certain techniques and commands. For example, one tutorial shows how to make a crane with a moving arm and a chain of spheres attached to it. Each tutorial guides you through from starting with a new program to building up to create the end result.
14) The last section contains a list of all the examples included with Dark Physics so you can quickly browse through and see what is available.

Reference
Alongside the extensive documentation is a detailed reference guide outlining all of the approximately 500 commands included with Dark Physics. Each command has its own page explaining how to use it and its parameters and return values.
Tools
One of the most recent additions to Dark Physics is the remote debugger tool. This tool can be run alongside Dark Physics programs and allows you to see exactly how the simulation is represented. You can also pause the simulation and play it back.
Further Development
As we continue developing Dark Physics over the next few days we will be working on more demonstration programs, adding more commands and refining the documentation.
Higher res screen shots are here: Shot 1, Shot 2, Shot 3, Shot 4, Shot 5 and Shot 6.
Pre-Order Dark Physics Today
You can pre-order Dark Physics. It is also available with Dark A.I. at a 15% discount.
The Ultimate DarkBASIC Professional Extension Pack

We have put together a new money-saving pack, filled with the latest extensions available for DarkBASIC Professional. You can save 25% when you buy the following extensions together:
Dark Physics
This is a pre-order for Dark Physics for DarkBASIC Professional. We have been publishing news and information about Dark Physics in the newsletter for the past few months, and the release is drawing ever closer. Including full support for PhysX hardware if available, Dark Physics offers rigid bodies, ragdolls, vehicle commands, fluids, particles, cloth and many more. Over 500 commands, over 75 example demo programs included and over 100 pages of documentation. This extension will literally bring your games alive.
Dark A.I.
Add comprehensive AI features to your games. Including: Path Finding, Teams, Entity commands, manual control, avoidance, Zones, direct integration, containers, debugging commands, and the ability to work in 2D or 3D.
Unity
Unity allows your DarkBASIC Professional games to utilise the Lua scripting language in your games. Lua has been used in the games industry for years - and its users include, but are not limited to the likes of Far Cry, Homeworld 2, Warcraft III, Baldurs Gate and more.
Blue GUI 2
BlueGUI allows you to add windows controls or gadgets such as buttons, tabs, treeviews and even Web Browsers to your DarkBASIC Professional programs. In addition, it allows you to add true windows menus and common dialogs such as File Open/Save, Colour Picker and Folder Picker to your applications.
Enhancements Expansion Pack
This pack alone adds 179 new commands to DarkBASIC Professional, covering such features as: Ogg Vorbis Replay, File Blocks, File Mapping, Drive Information, CPU Information, Computer Identification, Display Control, Common Dialogs, Internet Access, Speech, Memory and EAX Audio Effects.
EZ Rotate
EZrotate provides an easy to use, yet powerful command set that helps to eliminate the complicated mathematics from your projects. Finally, you can make your objects do what you want with simple commands instead of complicated math routines, giving you the ability to work with Matrix Mathematics and Quaternion values. With True Global Rotation, Local Rotation, Vector Rotation, Orbit Rotation, Rotate Towards, Turn Pitch Towards, Axis and Angle commands, this will provide a new level of power over your objects.
Texture Max
TextureMax is a tool for easily adding great customisation to the media of your DarkBASIC Professional project. Using the TextureMax application you can separate your images into channels. You can then apply different colours to each channel adding instant variation to your media.
Buy Now - Save 25%
You can buy all of the Extensions listed above together for $157.99, €123.99, £84.99. Saving you over $50. Click here to order online.
Arvoch Conflict

We were excited to receive news from SW3D Games that their new title, the Arvoch Conflict (working title), is nearing completion. Those of you familiar with the history of DarkBASIC will no doubt already be aware of the highly successful series of Starwraith games, all of them shining examples of what the language is capable of, and highly praised by the gaming media and fans alike. Arvoch takes the series to a new level, and we're proud to showcase this via an exclusive video and screen shots.
Over 100 years have passed since the last encounter with the Vonari. The Alliance has used the time to research and reverse engineer advanced alien technology in an effort to better confront the Vonari threat. The result is a new breed of powerful spacecraft and weapons. But a mysterious development by the Vonari is about to shake humanity's confidence at its core.
Arvoch Conflict brings elements of real-time strategy, adventure, and exploration to the traditional theme of first person perspective 3D space combat simulation. Offering a wide range of ways to play and modify the game, it provides a unique feature packed template for space-sim fans to engage in.

Gameplay Features
- Single player campaign spanning several systems with objectives that include rescue, recovery, mine field clearing, ship protection, exploration, patrol, planetary surface strikes, defence system placement, and much more. As your experience and rank increases, you'll be given access to far more powerful ships and weapons.
- Free flight / test fly, instant action, and multiple training sessions help players learn the skills necessary to master the game and advance their career as a squadron commander.
- All-new multiplayer system that lets you manage settings and connections from one master screen. And for the first time, take your squadron with you into multiplayer to battle against other players and their unique squadrons. Unite with other squadron commanders using the clan ID system and battle as teams.
- Over a dozen new ships are introduced nearly all of which can be flown by the player. The new range of ships also adds new classes including scouts, interceptors, bombers, and cruisers.
- Command your squadron with specific instructions and even order individual ships to complete desired objectives. Your ability to lead and plan is now just as important as your combat skill.
- You are in direct control of your squadron's ships and weapons prior to each mission. A drag and drop interface is used to let you manage your squadron.
- Realistic and manageable newtonian based physics/flight system. Thanks to the powerful inertial dampening system, you can make quick turns without the lengthy sliding found in many newtonian based physics flight models. Turn off the inertial dampening system if you want to drift unrestricted. Arvoch Conflict's physics system is designed to offer the benefits of both a traditional fast manoeuvring 'arcade' type flight system and the diverse strategic combat tactics offered by a newtonian system.
- Manage targets through multiple selection options and cockpit MFD. Point-and-click to select a target in visual range, lock on a target in the gun sight, select a target from a range list on the cockpit display, or use fast key/button options to select a target. Track friendly, moderate, and hostile targets with the same system to monitor the status and position of both your squadron and other objects/ships in the area.
- Lock onto objects in space with the tractor beam to place them in needed positions for combat and defence. Use the beam to recover valuable materials and resources.
- Support for keyboard, mouse, joystick, and gamepad controls. Flight controls and functions can be changed and remapped.
Graphics and Environment
- New graphics engine that includes vastly improved lighting and textures along with new elements like HUD indicator shadows and reflection/gloss effects. Missile contrails, advanced particle effects, lens flare corona haze, and multiple light source illumination effects are also new features of the engine.
- Virtually unlimited universe size allows all gameplay events to take place in one massive environment. Nebula clouds, planets, asteroid fields, moons, and other environment objects can be flown to seamlessly.
- Seamlessly fly to and attack targets on the surface of large planets, no cut scenes or halting of gameplay. The transition to planet atmospheres is seamless, including automated flight control/display adjustments to change as needed to adapt to different environmental conditions.
- Complete in-scene 3D cockpit. Gauges, HUD, and cockpit structures are now rendered entirely with the 3D engine, no more static 2D overlay displays with 2D text. The cockpit, including the gauges and their readouts, moves and responds to inertia, view selection, lighting, and environment activities. Subtle glass reflections, helmet visor based HUD, and panning first person view controls compliment the new 3D cockpit system. For players who prefer an old flat 2D style appearance with no cockpit have the option to disable the 3D cockpit and use a static HUD, if desired.
- Ultra high resolution scenery textures for nebula backdrops, planets, clouds, and more help add to the new look, environmental immersion, and feel of the game.
Audio
- High quality sounds with improved environmental effects.
- Effects like the cycling inbound missile range signal, vocal warning alerts, and much more active radio chatter provide a new level of audio detail.
Video Download
We have a great 2 minute video of this game in action to show you. Please note that it features quite old graphics, but even so you'll get a good feel for the style of gameplay on offer here. The video is available in two formats from the following links:
Download WMV (Windows Media) Video (8.8MB)
The game is due to be released in the Fall 2006, and we hope to bring you more news and screen shots and development progresses. For now you can find out more about both Arvoch and the other SW3D games at www.starwraith.com
Retro Remakes 2006 Competition

Over at the world famous Retro Remakes web site, a brand new programming competition starts today. The Game Creators are one of the sponsors and there are other great prizes on offer from the likes of X-Arcade, Retro Gamer Magazine, Cosmigo and many more. First prize nets you £1,159 worth of kit including a GP2X hand-held console, an X-Arcade Trackball unit, a SmartNAV head tracker, books, software, subscriptions, games and even a dance mat!
The theme of the competition this year is: "Good remakes of good games that anyone can play, regardless of their ability".
The key to it is of course the part 'anyone can play'. That means no ball-bustingly hard shoot-em-ups, or puzzle games that require a Chemistry degree to figure out. It also means games should allow for players that might not be as 'quick' as the more traditional gamer, i.e. don't rely on them having split second reflexes. Personally I think this will make for a very interesting competition. As well as this rule, your game has to be a remake of an 8 or 16 bit title. That is the whole point of the Retro Remakes web site after-all, to offer for download free remakes of classic and obscure titles. They are not looking for pixel perfect renditions (infact those will be disqualified), you have to ENHANCE the game somehow.
The competition ends at 23:59hrs (UK Time) on August 31st, 2006. So you've plenty of time to get coding. We (The Game Creators) will not launch our own yearly competition until after this date, so there will be no risk of your time clashing with anything we may announce. In short, if you feel up to the challenge, enter and enjoy this competition. We would very much like to know which DB/DBPro people enter this competition, so please email us or post your games to our forum so we may run a feature on this later on in the year.
For the full rules list, prize details and entry guidelines please go to: http://www.retroremakes.com/comp2006/
Gem Towers

Gem Towers is a new release from long-time DarkBASIC maestro Paul Varney. Those of you new to the newsletter can catch an interview with Paul way back in issue 1, where at the time he had just released the classic Virtual Insanity game, and was lead graphic artist for Shiny Entertainment. So what is Gem Towers all about? It's a 3D puzzle game. You must remove the required number of gems in order to progress to the next level. You do this by swapping gems so that they create a line of 3 (or more) of the same colour. You can only move the gems if they are going to create a set.
You can spin the whole gem grid in full 3D, and gems have 26 possible neighbours, so you need to look carefully at the grid from each angle, to see if there is anything you've missed. As with most games of this nature, if you stack them correctly you can set off entire chain reactions. It's not impossible to finish a whole level with just one swap. If you get totally stuck you can sacrifice one of your lives in order to skip the level. The further you play, the more colours enter the grid (and therefore, the harder it gets).
Everything looks lovely - the gems glisten and reflect the light, the controls are smooth and the whole game very responsive. It isn't perfect however - the random nature of the gem placement means that you can often start on a really difficult level, only to have to skip it in order to stand a chance on the next. And sometimes the new gems drop onto the grid too fast for you to be able to see clearly what is underneath them. But having said that, this is a fine release and for a free game - a great time killer.
Download Gem Towers from Paul Varney's website, or from our file server (3.8MB)
Text Adventure Competition

Well it's a month for competitions this month! Not only do we have our mini Dark AI compo, and the Retro Remakes compo starting, but we've also got this unique little challenge - the Text Adventure Competition. Again The Game Creators are stumping up a prize for this one, a copy of Dark A.I. to the winning text adventure. Have fun, and here follow the details...
A text adventure is a PC game wherein the player navigates through a world by reading long segments of story, and then selecting a path or action from a list of options supplied by the software. Some text adventures use basic variables to offer players items, weapons, etc. to utilize during play. Most text adventures fall into one of two categories: The option list adventure, and the parser adventure. "Option list" adventures have a menu of options wherein a player can select an action from a list of choices (such as, "1. go east, 2. go west" and the player presses one or two, or presses the corresponding number and then presses enter). "Parser" adventures allow the player to type in commands, such as "open door," "go north," "eat apple," etc., and the software can detect specific segments of code that is entered into its entry line. These are far more complicated to create and implement, and thus they will score higher.
The contest will be scored entirely on four qualities: originality, story development, writing ability, and technical design. Originality depicts your title's general uniqueness, both in story and software design. Story Development rates how well the game projects the story from start to finish... you'll earn more points if your story is fluid and easily understood. Writing Ability depicts how well the game is worded and points will be decided based on grammar, spelling, proper word usage, etc. Last but not least, Software Design rates how well your actual program runs from a technical standpoint. Did you use a list system, or a more complicated parser system? Are each of your subroutines and functions linked together properly? Make sure your final game doesn't have any bugs to score high here.
Scores will be based on a 10.0 point system. You'll earn a maximum of 10.0 points for each of the four categories, and 0.0 is the minimum. Each of these is then averaged out and rounded to create your final score. In other words, if you earn 9.1 on originality, 8.5 on story development, 7.3 on writing ability, and 5.2 on software design, your total score would be 7.525... rounded to 7.5. The participant with the highest score wins the contest. In the case of a tie, the judges will convene and decide on who should win the tie. All results and scores are final.
Feel like joining in? Then check out this forum thread where it is all happening!
DBPro Tutorial - Vertex Manipulation - by Steve Vink

This month I have been inspired. One small snippet of code triggered a whole raft of ideas that I need to share in the form of this tutorial. And this is just the start, the same snippet of code sent another regular contributor to the DarkBASIC Professional world into their own realm of possibilities, and I imagine you'll see these in a future newsletter.
Vertex manipulation is an understated gem in DarkBASIC Professional. I have to admit, it's not a subject that has grabbed my attention previously, and that is mainly because I considered them too fiddly. Working out which vertex is where in a model, and how to move it correctly to get the desired results appears to be a mundane task. Over the next few minutes, I am going to show you how to use the vertex commands in a way that doesn't tax your brain, requires very little knowledge of your objects and gets some great results in no time at all. Along the way, we will use some very simple vector manipulation to help us create simple results quickly.
Firstly, you need to understand the concepts. Let's take a look at Vertices, Polygons and Vectors:
Vertex
A vertex is quite simply a point in 3D space, and we use it to construct the polygons of a model.
Polygon
Connecting 3 or more vertices creates a polygon. Creating several polygons allows us to construct models. 3D engines prefer 3-sided polygons due to the Scanline Rendering technique used, and you will find that high-quality game models apply this law as strictly as possible. Taking the example of a cube, there are 12 polygons (2 triangles per side), and 4 vertices per side, totaling 24 vertices. Note that each polygon has 3 vertices, but they can also share vertices to reduce the total required for the object.
Vector
A vector is a description of a direction, and it's magnitude (length). Don't let that scare you, we can use the mathematical abilities of vectors to our advantage without fully understanding vector mathematics.
Example 1 - Identifying the vertices
The first step in using vertex manipulation is identifying the vertices in our object. Download and install the examples accompanying this tutorial. Compile and run example 1, which simply identifies each vertex in a sphere object. The commands we use to do this are:
GET VERTEXDATA POSITION X()
GET VERTEXDATA POSITION Y()
GET VERTEXDATA POSITION Z()
In order to extract this information, it is necessary to first identify and lock the object and the specific limb. For primitive objects there is only one limb, limb 0. We also need to know the number of vertices, for which there is a command. The code to identify the positions of each one now looks like so:
	LOCK VERTEXDATA FOR LIMB OBJ,LIMB,1

	FOR N=0 TO GET VERTEXDATA VERTEX COUNT()
		X# = GET VERTEXDATA POSITION X(N)
		Y# = GET VERTEXDATA POSITION Y(N)
		Z# = GET VERTEXDATA POSITION Z(N)
	NEXT N

	UNLOCK VERTEXDATA
In the examples the positions have been retrieved and stored in an array, and an associated vector for each one. This may seem like overkill at the moment, but in later examples we will use this structure to produce some interesting effects. To briefly explain the vectors, they are being used to store the position of each vertex in relation to the object.
NULL = MAKE VECTOR3(V)
SET VECTOR3 V, 1,2,3
In this example, if you start at point 0,0,0 in your object and travel a distance of 1,2 and 3 units in the X, Y and Z plains respectively, you will arrive at the vertex position. Each vertex is represented in this format. To conclude this example in identifying the vertices, you will note that in the sample code, each vertex has been represented by a sphere. The example glues each sphere to the main object so that we can rotate them all in unison. Now, cast your mind back to Grant Clarke's tutorial in the April 2006 issue of the newsletter. Already, you have massive potential to create some very impressive game effects using vertices combined with Grant's techniques, and we haven't started moving vertices around yet!
Example 2 - Scaling using Vertex Commands
A gentle introduction to changing vertices using the command set is to scale the sphere. This is also where the vector manipulation commands come into their own. Because the vector describes the direction from the centre of the object, scaling the length of it will move the object along it's normals. In plain English, we can move the vertices towards and away from the centre along a virtual spoke in the sphere. Scaling a vector will achieve this using complex calculations hidden from our code, and the command looks like so:
Scale Vector3 V, V, 0.9
This will scale the vector to 90% of it's original size and saves the result back to itself. The effect of this is that the position in space, or our vertex position, is pulled towards the centre of the sphere. Review, compile and run example 2 to see this in action. Each vertex is modified in exactly the same fashion, over time, and the sphere shrinks in size. The new vector position is applied using the following command, which must be encapsulated again by the commands to lock and unlock the vertex data.
SET VERTEXDATA POSITION N, X#, Y#,Z#
We can now identify vertices, extract their position and also change their position too. It's time to get a little more creative.
Example 3 - Making new shapes
So far, we have treated all vertices equally. But what if we identify specific ranges of vertices, and change only these? As mentioned at the start, it's possible to create some fascinating effects without knowing exactly where each vertex lies in the model. In this example, we will locate every vertex that lies within 10% of the X, Y and Z axes through simple mathematics. Each one will be scaled, leaving the remaining batch untouched. Review, compile and run the example. I can guarantee that the 3D flower screensaver will lose it's impressive "How do they do that?" appeal in an instant.
Example 4 - Your own Primitives
Sometimes you feel the need for more primitives. If only DarkBASIC Professional had a capsule shape, I hear you all cry! This was my inspiration for this tutorial. The resident coders at TGC impressed me with a little vertex magic to turn a sphere into a pill-shaped capsule. I'll leave you to ponder over that one and apply your new-found skills later; for now we'll use the example of a dome shaped building to demonstrate the possibilities.
Creating a flat-bottomed building with a dome-shaped roof is actually incredibly simple, and we'll use the previous method of isolating and modifying a subset of the vertices. This time, we'll take all vertices below the X/Z plain and drag them down to the lowest point on the sphere. Again, the example has been created to apply the change over time so you can visualise the methodology. The transition in itself is a pleasant effect to watch. Review, compile and run the code to create your very own non-standard primitive.
Example 5 - Organic Shapes
Finally, let's take a look at how an organic object could be recreated. By resizing different areas of a sphere over time, we can give the appearance of a "blob". Many games suffer from their rigid appearance, and lack of living organisms. Our blob technique could breathe life into creatures, clouds and even living, deforming landscapes. Review, compile and run the concluding example. A sinusoidal calculation has been used to push and pull at the vertices, using their vertical distance from the centre as a modifier.
Hopefully this tutorial has given your imagination enough nutrition to take your games to the next level. Using vertex manipulation we have shown how to control other objects, scale and modify shapes, and create more natural, organic objects. Along the way there has been a gentle introduction to vectors and their ability to simplify the calculations behind the techniques. Remember we have only used spheres and basic techniques here, applying the same principles to other objects and using other simple formulas will open up other avenues for your game development.
Until next time, Happy Coding!
Download this tutorial and code.
From the Forums
Here is a selection of current hot topics worth checking out ...
Firewall 2
Here Xander shows us screen shots and videos from his latest game in production, Firewall 2: Second Defense. The original game is a firm community favourite, and the sequel looks like it will take some beating! Firewall is an RTS style game, set inside a computer system.
Plasma Effect
IanM is apparently on some kind of a retro demo bender at the moment (which is no bad thing!) and here is a kicking old-skool plasma routine, complete with a very handy HSV to RGB conversion function. Oh and this is all in 20 lines. Stonking :) I reckon we ought to hold a TGC demo compo.
3D Minesweeper
The author of Gem Towers (seen elsewhere this issue) has also released this - a fully 3D version of Minesweeper, compiled for DBPro 6.0, with full source code. Nice one :)
Cloud Generator
Ric has done it again, this time it is a parallax scrolling, gorgeously fading, smooth and realistic cloud routine that doesn't use any media at all, yet still looks the biz. Nice one!
Zillipede
This is a retro styled arcade game, which is pretty much a direct clone of the classic bug shooters Centipede and Millipede. Blast the pede as it snakes its way down the level, dodging the mushrooms. Nicely done (graphics could do with an overhaul though), but extremely fun to play - and that is what counts most here.
Uncle Sam's Particle System
Uncle Sam has released his particle system for all to use. This is a very comprehensive system indeed, and the work he has put into it shows. There are video examples, demos and built-in special effects such as dust, dirt, sparks and snow. It even has an editor, which exports your particle settings. Get them in your own games with just one line of code!
FPS Creator Newsfest

FPSC Source Code for Upgrade 6.2
We (TGC) have updated the FPS Creator Game Source Code so it now compiles under DarkBASIC Professional Upgrade 6.0. The update also fixes a few issues including the 1 fps rate problem (set RemoveSafetyCode=Yes in SETUP.INI), Characters no longer sink into the floor, CSG doors and windows work again and there is a general overall speed increase thanks to Upgrade 6.0 being used. This version of the code will be released with Upgrade 6.2 shortly.
FPS Creator German Edition
A fully localised German version of FPS Creator is now available. This is a complete boxed edition, but the software has a German interface and manual. It is available now from Amazon.de
Custom Skyboxes with Terragen Tutorial
Forum member taurus ac195 has written a tutorial on how to use Terragen (a free landscape rendering package) to create skyboxes you can use in FPS Creator. Download the PDF file from here.
TGC Disclaimer: Please remember that The Game Creators provide newsletter information for your own use and do not support the products listed above. I.e. while we believe the traders to be responsible and honourable, we can't bail you out if they foul up an order.
darkbasicgames.com

darkbasicgames.com is a new web site showcasing the latest and greatest games to be made in DarkBASIC (Classic and Professional). Check out the latest games, or visit the directory to see all the games featured on the site. The news page has details of the latest additions to the site and a feedback form to contact the webmaster, Robin. Comments on a game you've played? Add a review and help this website grow!
Visit http://www.darkbasicgames.com.
UK DarkBASIC Convention 2006
The final unofficial DBP convention is being organised by Nicholas Kingsley and is being held at the Ship hotel in Chichester once again on the 16th and 17th September 2006. Come along and meet your fellow DBP coders. Philip Young will be giving a talk on company law, which will be useful to those looking to start their own games company and others will give talks too.
The price is £40 per person which can be paid on the door or via the website. This does not include travel or accommodation. Light refreshments will be served at the convention. If you have any queries then post them on the convention thread on the forums or email nichkk@gotadsl.co.uk for more information.
Tech Tips - 3D Arcade Game Environments 2 - by Grant Clark

Greetings fellow coders, welcome to the second part in our arcade game environments series.
Last month saw the functions that actually make and move the landscape, This month we will look more at the theory behind the system before proceeding any further. We'll talk more about how it actually wraps the scene and how it knows where to put the recycled landscape tiles and other expanded uses of this system.

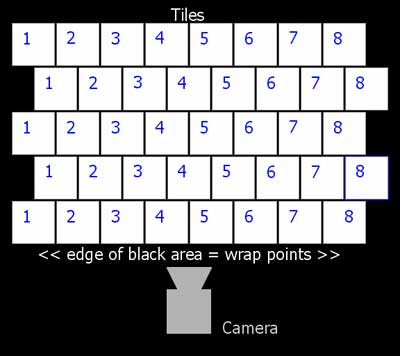
Each row that makes up the landscape consists of 8 tiles, as the tiles move they will reach a wrap-point hidden off the screen. When a tile reaches the wrap point it must be moved to the new location with no margin of error or gaps and overlaps will appear in the landscape as the errors get worse, basically one error will have a knock-on effect over the whole of the row of tiles, to get around this problem of correct positioning without the errors we use the neighbour policy I referred to last month, a very simple process that'll save many headaches on any tile wrapping system.
The neighbour policy works by looking at the number of the current tile ( 1 - 8 ) and the direction the scape moves. consider the following number layout and direction of movement:

Let's imagine the landscape in motion now, with the numbers representing the tiles in one row of the landscape with the direction of movement from right to left across the screen. When tile number 1 has moved to the location of the wrap point, (with the rest of the tiles behind it moving also) it needs to find out where it should go during recycling. we do this by using the tiles neighbours as positional references. tile 1 can only have tile 2 as one neighbour and tile 8 as the other. When tile 1 reaches the left hand wrap point we have to look for its neighbours, tile 1 being the lowest number cannot have a tile 0 as a neighbour so the only other viable option for a neighbour is the highest number tile in the row. so we move the tile 1 object to the position of tile 8 plus its width. now our number sequence will look like this.

Each time a tile hits the wrap point it follows the same basic rules, find my neighbour and position me a single tiles width behind the correct neighbour until we are back where we started, and keep on going.
Now you'll probably ask the question why have the neighbour policy at all? What you have just shown us is fairly obvious and simple, it can also be done with a for - next loop in a much easier fashion. This is very true, but now consider the scape being able to move and wrap in both directions at any speed you wish, this is where the neighbour policy kicks in and helps us greatly with accurate positioning of the tiles in both directions.
Here is a simple breakdown of what's going on in each direction of the landscape.
RIGHT TO LEFT
- tile 1 wraps (the lowest number tile), we find the highest number tile and position tile 1 accordingly.
- tile 2 wraps, we find the tile below this number (it has a neighbour with a number lower than itself) and position this tile properly.
- tile 3 wraps, we find the tile below this number again.
this process is repeated until we reach tile 8, tile 8 is the highest number tile and looks for the lowest tile number as its neighbour
LEFT TO RIGHT
- tile 8 wraps (the highest number tile), we find the lowest number tile (1) and position tile 8 accordingly.
- tile 7 wraps, we find the tile above this number (tile 7 has 8 as a higher neighbour) and position tile 7 properly.
- tile 6 wraps, we find the tile above this number again.
This process is repeated until we arrive back at tile number 1, tile number 1 is the lowest number tile and looks for the highest number as its neighbour Simple logic and observations put to good use.
The Advantage of the neighbour system
This process is happening at the same time on all the landscape rows on a frame by frame basis (another advantage over using for - next loops in this scenario), the only slight difference between the rows in the landscape is the offset each row has from the last, its best to think of standard house bricks and the way they are offset from each other layer after layer, like in the diagram below. You don't have to have an offset in the neighbour though and in most cases you would not use one.
This method of tile wrapping is very accurate and not subject to timing issues of a non neighbour policy tile system, which usually has inherent errors in the placement of tiles when a frame is dropped and no account has been taken of the fact that a tile might have actually passed or overshot the wrap point, in turn upsetting the placement of all following tiles. this does away with a fixed location for recycled tile placement, which is a common pitfall newer coders will often find themselves in, this is simply because they have not taken into account that the tiles might have actually moved further past the wrap point than they think. this system takes that into account automatically, regardless of landscape speed and overshooting the wrap points. After all, were only interested in the bit you can actually see, so if there is overshooting due to speed, we are not going to be aware of the continual shift back and forth of the overshoot amount which could be quite large in some cases.
Now, Because we now know the exact location for placement of the tiles, it makes the system ripe for adding objects that are tied to the locations of specific tiles. By this I mean things like buildings and other objects that can form part of your game world over and above the scape itself. Another 'cheat option' for the same effect is to simply attach limbs to the landscape tiles in a 3d editor and hide the limbs you don't want seen, and show the ones you do want seen each time the tile hits the wrap point, this can give us a much more dynamic landscape with good variation as the hidden limbs themselves can actually be more landscape tiles as well as landscape decoration. limbs will play an important part in the continual development of the system from this point onward.
Another addition to the affray will be Dark Physics, which we will be using to aid the development of some of the more complex effects that will bring added eye candy to our world. But don't panic, you don't have to own Dark Physics to use the system, you just have more stuff to play with in the Dark Physics enabled versions of the functions.
Back to getting scary with neighbours (In effect, not complexity.)
The neighbour system can be applied to any of the 3 axis, or any combination of them. This means that the neighbour system suits maps that appear to scroll both vertically and horizontally in a top down view scenario, or even more amazing is using it on all 3 axis allows you to scroll a cubic volume in any direction you want by looking at the neighbours on all 3 axis and having 6 wrap points. scrolling volumes are very cool and rarely seen, when in simple truth they are as easy as a single axis system, it just needs a little more thought to accomplish.
I'll leave you now with that thought, and an apology.
To help make up for the lack of added functions this month, I have included a pack of small bitmap fonts for use in your games as way of an apology, Nintendo lovers should like them and when I say small I mean small. I have been working constantly testing Dark Physics over the last month and it has consumed virtually every waking hour I have, thankfully things have eased off a bit as the package nears completion and I have more time to devote to the functions. I can't deny I have had fun though.
Till next month, Cya.
Download the Tiny Fonts Package :)
This months Winner
Each month we pluck the email address of one lucky subscriber from the list, and award them with a free copy of DarkBASIC Professional. To claim it all you have to do is send us an email (from the winning email address, naturally) The winner this month is: reg.joy@??????????.com
Outro
Share your news with over 12,500 active games developers!
If you have something you'd like featured in a future issue then please get in touch and include as much information as possible (including where applicable: screen shots, URLs and zip files).
Issue 42 deadline - June 29th.