
editorial / may 06

Development activity has been as frenzied as ever, both within TGC towers, and in our community. Results of the Caimen competition are in, with DarkBASIC developed games pulling in many of the top prizes including 2nd, 3rd, 4th and 7th places out of the top 10 alone! Congratulations also to Grant for coming 3rd in the Shmup Dev contest as well (and kudos to the Laser Assult 3 author for coming 10th, again with a DBPro game). It's really encouraging to see this level of activity, and the quality of the games being produced. Hopefully Upgrade 6, which we release in final this month, will give you the rest of the stability you require to create even more great games in DBPro.
In the newsletter this month we see the release of a new animated sprite pack, part one of a new tutorial series on creating 3D Arcade Environments in your games. Steve Vink concludes his HUD tutorial. There are stacks of FPS Creator related news items, and no less than two competitions. We even take time out to play a little easter game. For those of you eagerly awaiting Dark Physics we present you a small snippet of source code, so you can see how the commands work, plus a screen shot of the new format documentation you can expect to receive with the extension. Release isn't far away now!
Don't forget you can read this newsletter online via your web browser too, which is a much nicer experience if you are stuck within the realms of Hotmail or Gmail. I'll see you next month for issue 41 - I have a feeling its going to be a packed one.
Until next month, keep coding!
contents
(1) DBPro Upgrade 6 (2) Dark Physics News (3) Win a PC Competition (4) FPSC Screenshot Compo (5) Animated Sprite Pack (6) Easter Journey (7) PlayBasic News (8) DBPro Mastery (9) From the Forums (10) FPS Creator News (11) Murky Media Actor Pack (12) 20-Liner (13) DBPro Tech Tips (14) The Winner (15) Outro
DarkBASIC Professional Upgrade 6 Released
After 4 beta versions and no less than 10 release-candidates, we have finally completed Upgrade 6 for DarkBASIC Professional. This is a truly massive upgrade bringing hundreds of fixes and enhancements to the core language. Stability is vastly improved, the EXE files are smaller, the start of a brand new help system is in place, and bugs across all areas of the language have been crushed. Upgrade 6 has been a real community effort and without the due diligence, help and support shown through our forums, U6 would never have been as comprehensive as it is. So if you partook in any of the beta testing, we applaud you and thank you for your support.
So what happens now?
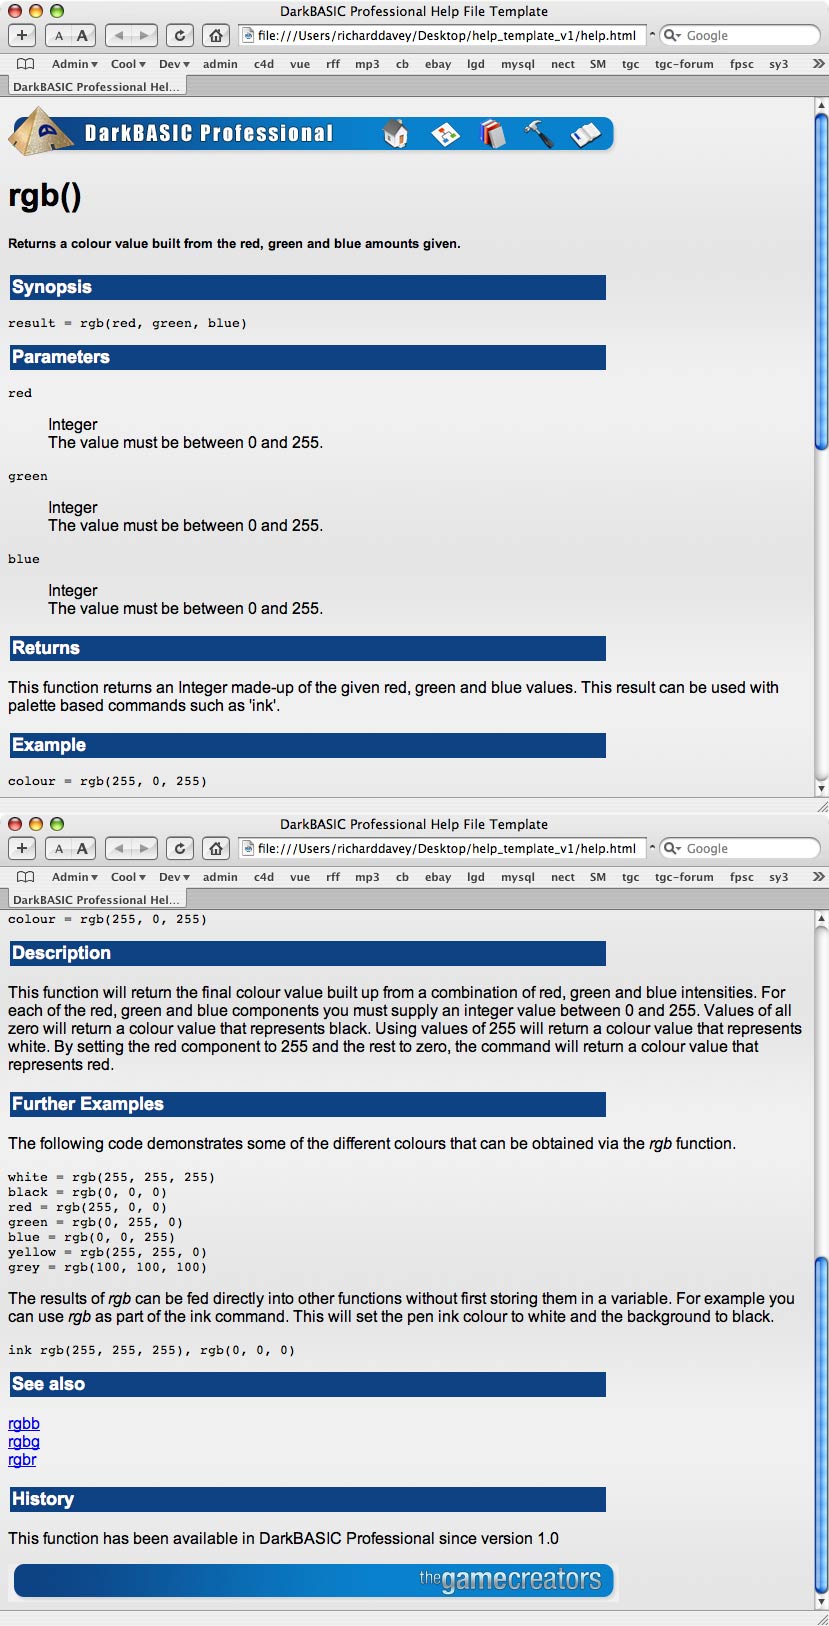
Lee Bamber (our lead developer) is taking a well earned vacation for a few weeks. Upon his return we will collect together the feedback relating to the U6 release and prepare a 6.1 version. 6.1 will tie-up any loose ends, or new issues, that surface over the coming weeks now that U6 has been released into the wider world. You will also start to see the new format help files integrated into 6.1 - click here for a sneak peek at the new style layout and content structure.
We need to concentrate on making sure that the Dark Physics and Dark A.I. releases go smoothly this month, but beyond that we plan to release an upgrade to the Dark Game Development Kit that will incorprate the U6 (and 6.1) changes.
Download Upgrade 6: dbpro_upgrade_6.zip (13 MB). Be sure to heed the readme file notices about the version of DirectX required - in short, if you have not upgraded DirectX recently, go here and grab the official Feb. 2006 version.
Dark Physics Sneak Peek
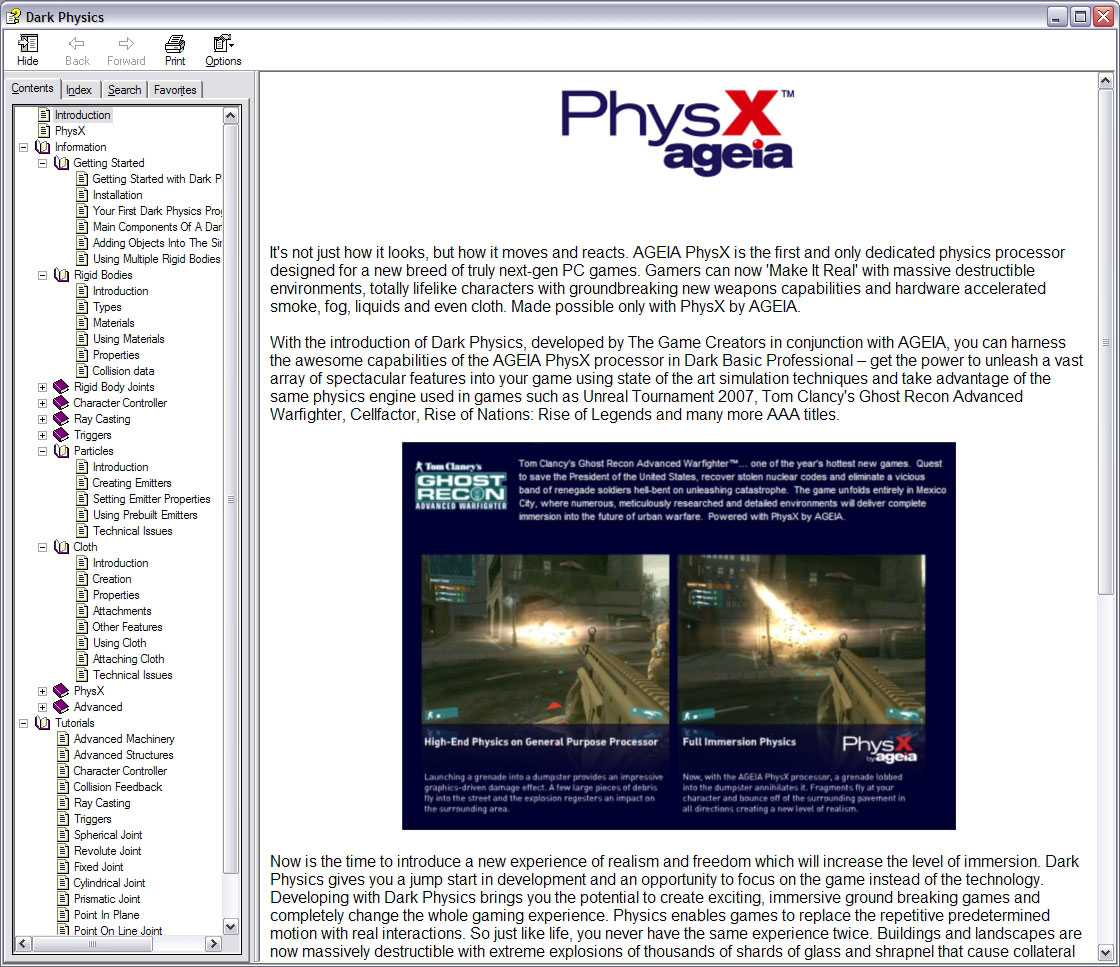
Over the past few months The Game Creators have been developing a brand new, exciting expansion pack for DarkBASIC Professional. This new pack titled 'Dark Physics' offers a fantastic opportunity to integrate the high-calibre AGEIA physics engine into your developments, that has the potential to completely redefine your gaming experience. You can now get the chance to utilise the same physics engine as used in games such as Unreal Tournament 2007, Tom Clancy's Ghost Recon Advanced Warfighter, Cellfactor, Rise of Nations: Rise of Legends and many more top class titles.
Developing with Dark Physics brings you the potential to create exciting, immersive ground breaking games and completely change the whole gaming experience. Physics enables games to replace the repetitive predetermined motion with real interactions. So just like life, you never have the same experience twice. Buildings and landscapes are now massively destructible with extreme explosions of thousands of shards of glass and shrapnel that cause collateral damage; lifelike characters run, jump, block, tackle, swim or fly in remarkably natural lifelike ways; realistic smoke, fog and oozing fluids now react with characters, objects and entire physical environments. The possibilities are never ending.
Imagine a game that has explosions causing dust and collateral debris, spectacular weapons with unpredictable effects, cloth that drapes and tears, lush foliage that sways naturally when brushed against, dense smoke and fog that billow around objects in motion and massive interactive environments - all of this is possible when developing your games with Dark Physics.
The command set provided by Dark Physics has been developed with ease of use in mind while still allowing more advanced developers to take full control. It has everything you could possibly need to create awesome simulations with particles, fluids, cloth, vehicles and much more. It also allows you to take full advantage of the AGEIA PhysX processor: a specialized accelerator dedicated solely to delivering rich immersive physical gaming environments that is currently available from leading game system vendors such as Dell, Alienware and Falcon Northwest and soon from top card makers BFG and ASUS.
To support all of this extensive documentation has been provided with a thorough getting started guide, background information on all of the sections, a collection of tutorials that cover topics such as constructing a bridge, using joints, making machinery and creating tearable cloth. A reference section is also included detailing all of the commands and finally a collection of examples is provided showcasing effects that can be achieved when using Dark Physics.
Here is a simple example program that demonstrates how easy it is to integrate Dark Physics with your programs. It simply creates a stack of cubes and lets you fire spheres into it and see the reactions that take place. Don't worry about not understanding the commands - all of this and a great deal more is fully explained in the documentation supplied with Dark Physics.
phy start
sync on
sync rate 60
autocam off

make object box 1, 10, 0.5, 10
position object 1, 0, -0.25, 0
phy make rigid body static box 1

levels = 20
ID = 1

for y = 0 to levels
	for x = 0 to levels - y
		make object cube ID, 0.2
		color object ID, rgb(rnd(255), rnd(255), rnd(255))
		position object ID, (x + 0.5 * y) * 0.21 - 1.5, y * 0.21 + 0.1, 0
		phy make rigid body dynamic box i
		inc ID
	next x
next y

position camera 0, 2, -4

do
	if spacekey()
		make object sphere ID, 0.6
		position object ID, camera position x(), camera position y(), camera positionz()
		phy make rigid body dynamic sphere ID
		phy set rigid body velocity ID, 0, 3, 10
		inc ID
	endif

	phy update
	sync
loop
Keep a look out for the new Dark Physics expansion pack for Dark Basic Professional coming soon.
Win a Beast of a Gaming PC with FPS Creator

NVIDIA in association with The Game Creators and PC ZONE magazine are offering you the chance to win a brand new Dell XPS 600 gaming PC worth over £1000. Two runners-up will also receive an NVIDIA GeForce 7800 graphics card and a copy of FPS Creator.
So what do you have to do in order to see this behemoth ending up on your doorstep? Well, you need to get hold of issue 167 or 168 (May/June 2006) of PC ZONE magazine (UK edition), and turn to page 123 (or 114 in issue 168) quickly. There you will find the full instructions on entering the competition. Using either the 30-day trial of FPS Creator, or the full version, you must create a single level, which cannot take more than 5 minutes to complete. This level should be sent to PC ZONE (the address is in the magazine) on CD/DVD. Entries will then be judged by an expert panel, and rated on the following criteria: Design, Playability, Use of graphics and sound, and an overall Fun-ness rating.
The closing date is Wednesday May 24th 2006. PC ZONE can be found at all good newsagents, and online at http://www.pczone.co.uk. This competition is only open to residents of the United Kingdom.
FPS Creator Screen Shot Competition
Create a game in FPS Creator (full version or demo, we don't mind). Take some uber-sexy screen shots, and then post them to our FPSC forum. In return you could net yourself up to $200 worth of prizes! Now that's got to be worth a shot? (pun intended!)
There are 5 prizes of software vouchers for the best FPS Creator screen shot submited to our forum in the month of May. All you need to do is post your screen shot to the forum thread below. You can use the 'attach file' option to do this.
The media used in the screen shot must either be your own work, supplied with FPSC, or be something you legally own / have bought. In other words, don't rip models from Half Life 2 and post them in a shot, we don't want Valves lawyers breathing down our necks (and neither do you), thanks.
You have until the end of May 2006. Prizes are software vouchers for use on any TGC run web site. There are 5 prizes, $200 for first place, $100 for second and three runners-up prizes of $50.
Post shots here: http://forum.thegamecreators.com/?m=forum_view&t=77687&b=25
Benge's Animated Sprite Pack is Released
Our lead 3D artist, Simon Benge, has put together and released a comprehensive fully animated sprite/decal pack for use in DarkBASIC Professional and FPS Creator. The front cover image of the newsletter this month demonstrates some of the new animations running in an FPS Creator level.
Benge's Animated sprite pack consists of 60 professional quality animated billboard sprites designed to enhance the realism of your games. Animations include effects such as energy, fire, smoke, water impact and surface effects. The Billboard effects are 1024 x 1024 pixels in size, containing 16 frames of 256 x 256 pixels.
Also included are 40 static sprites for use as sprites in particle systems or game FX, ranging in size from 128 to 256 pixels.
Two packs are available now. The DarkBASIC Professional pack contains all the animated sprites in PNG, JPG, and AVI formats, and the static sprites as TGA images.
The FPS Creator pack automatically installs 60 animated decals into FPS Creator, ready for immediate use in your games. New emitter models for more accurate positioning and four new sounds are also included. Please note that the FPSC version doesn't include the 40 static sprites.
You can download a short video which shows the animations in action within an FPS Creator level. The video is just over 5MB in size and available in DivX AVI and QuickTime MOV formats.
The purchase price includes the download of both packs. You are allowed to use these sprites in either commercial or non-commercial games.
Animated Sprite Pack #1 is available now for only $19.99, €16.46, £11.99 from //www.thegamecreators.com/?m=view_product&id=2154
Game: Easter Journey

Easter may have come and gone, but this lovingly built Easter themed puzzle game will have you hanging around its 47 levels for some time to come! Originally created for the Caiman Easter Contest 2006 the goal of the game is to collect all of the eggs in each level. Viewed from a top-down perspective, the 3D levels have an almost Sokoban feel to them, but the variety from level to level is fantastic, taking you on a real journey.
Most of the levels are completed by opening a gate, which opens when all buttons on the level are depressed. However there are plenty of special hidden objects which you will find as you progress through the game. As if having a great game to play wasn't enough, there is also a comprehensive built-in level editor!
If you like your gaming more cerebral than a test of your reflexes then I cannot stress how fun and rewarding Easter Journey will be. Congratulations to Nimrod for winning 12th place with this game, out of 109 entrants.
Download Easter Journey from Mushroom Toads website, or from our file server (19MB)
PlayBasic News

PlayBasic V1.33 Demo Released
This month we can finally bring you latest PB demo. Release V1.33 is massive step from the five month old V1.089 release. So the changes are considerable, we've virtually gone over every inch of the package, from documentation (1104 documented commands), Examples & Tutorials (over 400) through implementing many improvements to the language syntax, runtime and graphics engine. The end result is a lot of bang for your buck!
There are too many individual features and improvements to list, but here's a bit of a cross section.
- Explicit Variable declaration
- Many New Libraries including (Windows Dialogs, Windows GUI, Mappy loader, Linked Lists, Data Packer, Maps etc)
- Pointers & Type improvements
- ActiveX/Net dll support
- Flash support
- Vertex rotation & polygon mesh support
- More sprite render and various new special combined Blit Image modes
- More Machine code MMX optimizations in 15/16 and 32bit graphics modes
- FX Maps support
- Faster runtime code execution & Superior runtime error trapping
Play Shape - Vector Collision
Shape collision is one the best keep secrets in the PlayBasic sprite engine. Shape collision allows for not only ultra fast rotated, scaled sprite collisions. But other cool features like calculating ray intersections, finding the nearest points and even reflecting and rebounding projectiles. One thing that was missing though, was a tool to assist users creating collision shapes. Introducing Play Shape. Play Shape is very simple editing tool. It allows the user to load an Image, scale & position it, then create outlines around the solid (hard) pixel areas. Once you are done, you can load the saved shapes directly into PB and experience a whole new level of sprite collision. Goto Play Shape
Axis
In keeping with the demo house cleaning we've been going through I decided to knock up a newer game demo to include in the package. Most of the existing demos were written by the original PB beta testers, some eighteen months or more ago. As such, they're pretty out of date. So I wanted to put something together that was more a representation of what's viable now. The result is the Axis demo.
AXIS is an old school shooter, where the player takes on a array of aliens with minimal art and a bunch of effects. While it's loosely playable, the objective was more to demonstrate the usage of the some of the Sprite Alpha blending features. Most of which, are probably going a tad over the top. So It's Not the most elegant looking thing I've ever seen. It also features vector shape and rotated sprite collisions, so it's well worth investigating. Download AXIS
Play Basic Code Tank Opens
One thing that has become obvious in recent times, is the need for a dedicated resource where PlayBasic users can share examples & tutorials with others. As such, we've very proud to announce the availability of the [u]PlayBasic Code Tank[/u]. Please feel free to load your PlayBasic creations. Have fun! Take Me PlayBasic Code Tank
Back to Grind Stone
Now that the demo is built, I can finally get stuck back into more compiler features. My first objective is to round out some things are not as robust as I'd like From Function Pointers and Optional parameters to fully implementing Arrays as field types, which we unfortunately only half done as we haven't had time to finish them off. Since with this demo our main priority was to bring the Documentation/Examples up to date. But there's always next month!
PlayBasic is on sale now for $34.95 from //www.thegamecreators.com
DBPro Tutorial - HUD Design Part 2 - by Steve Vink

Being a child of the original Star Wars era, I grew up with a fascination for the effects in the original trilogy. What captured me most was the fighter craft, and the way in which everything moved into place at just the right time. I remember vividly the targeting systems positioning themselves as they closed in on the Death Star's thermal exhaust port. It's this kind of effect that we will learn how to achieve in this tutorial. Not destroying a Death Star, but creating a seemingly event-driven HUD, that can move and interact alongside the main action. I would recommend downloading, compiling and running the example now, so you can visualise what we are trying to create.

Event-driven programming systems lend themselves to this kind of effect. We don't have that luxury, but we will emulate the same kind of system by using Asset Management techniques and extensive use of functions. You might want to familiarise yourself with these methods now by looking back at the previous tutorials covering these topics: Issue 27, Issue 28 and Issue 29.
The code also incorporates features introduced in Upgrade 6.0.
The System Design
The design of this system is made up of 3 layers; the visible objects themselves, an array of assets describing each item, and finally a secondary set of effect assets which will drive the animation of the HUD. Graphically, the design looks like so:

Bearing this structure in mind, we will construct our program in the following way:
Section 1: Objects
The actual HUD objects themselves will be 3D plains. We will size them to be the exact dimensions of the images that will be used to texture them; that is, the elements of our HUD. His makes visual design and positioning as simple as possible.
Section 2: Object Assets Array
Each object will be represented in an array of assets. I use the term "array" loosely, as the example code uses individual variables to make the code more legible and easier to follow. Nevertheless, each variable is a user defined type, containing the crucial data about each object:
- Object number
- Position
- References to Effects
Section 3: Effects Arrays
Each object can be faded, scaled and moved. In order to track the progression of each effect over time, the data concerning each object and each effect in stored in the corresponding array. This will include current position, size and alpha values, as well as the ultimate values for each effect. The duration of each effect is also managed in these arrays. To see the full definition of the data, take a look at the user defined types in the effects include file.
Doing the Hard Work first
As always, it is important to carry out the labour-intensive tasks outside of the main program loop. We will create all of our HUD elements as a pre-game procedure. The process for creating each HUD item is enclosed in a function. This carries out all of the necessary steps required to make a 3D plain into a suitable HUD object, and create the associated tracking data:
- Load the image
- Create the plain according to the image size
- Texture the plain with the image
- Switch on Transparency
- Switch off lighting
- Lock the object to the screen
- Associate the effects elements with the object
Although the list of processes is quite lengthy, it is easily applied using a simple function. The full process also ensures we have perfect HUD graphics.
3D Objects in a 2D environment
Positioning the HUD objects requires a conversion of screen coordinates into their respective 3D coordinates. As long as we construct the HUD whilst the camera is still in the default position, this is relatively easy, and can be performed using a simple calculation, wrapped in a function for ease of use:
function positionOnScreen(id,X#,Y#,Z#)
	position object id,(x#-400)+(object size x(id)/2.0),_
	-1*((y#-300)+(object size y(id)/2.0)),500 - Z#
endfunction
Don't worry about the finer details of this calculation; the important aspects are the X, Y and Z values. X and Y are self-explanatory; they provide the 2D coordinates of the screen position. The Z value is provided in order to allow overlapping of objects. Adjusting this by tenths of a unit is enough to ensure items are placed as expected on the screen. You can think of this in the same way as you would use Sprite Priority in a 2D HUD. To illustrate the full initialisation of a HUD item, this is what one of our elements is composed of codewise:
hudLeftPanel.id = 1
hudObjectCreate("panel_l.png", hudLeftPanel.id,2)
positionOnScreen(hudLeftPanel.id,1,1,0)
hudLeftPanel.alpha = effectCreateAlpha(hudLeftPanel.id)
hudLeftPanel.scale = effectCreateScale(hudLeftPanel.id)
hudLeftPanel.move = effectCreateMove(hudLeftPanel.id)
hudLeftPanel.exclude = 1: exclude object on hudLeftPanel.id
Bear in mind that this is the most intensive part as far as you, the coder, is concerned. From this point onwards, the process of animating your HUD is going to be a lot easier.
Let the Fun Begin!
We have now performed all of the difficult setup work. From this point onwards, simple calls to predefined functions will produce the results we desire. It would be worthwhile taking a look at the EffectAdd and EffectExecute functions at this stage. To add an effect to a HUD element, we can use one of 3 functions. They all require the object reference, start time and a delay time, as well as parameters specific to each effect:
- EffectAddAlpha: start and end alpha values
- EffectAddScale: start and end scale values
- EffectAddMove: start and end positions
These functions basically "switch on" the effect array element for the object in question. By calling the EffectExecute functions each cycle, every "switched on" object is executed, and the net effect is a beautifully choreographed HUD. Using the delay parameter, you can even switch on various staggered effects all at once, and they will come in to play when the delay expires. The final few lines of the progam cycle will look like so:
...
	x = effectExecuteAlpha()
	x = effectExecuteScale()
	x = effectExecuteMove()
	SYNC
LOOP
There are many ways to optimise this further, such as detecting when there are no effects to execute. But in this simple example, the overhead of the HUD is minimal. Even in a more complex scenario, the majority of the HUD process is simply checking the active flags and ignoring inactive components.
You could enhance this code still further. Bearing in mind that the components of the HUD are all 3D objects, you could introduce object rotation in the same fashion, and use cylinders and other primitives to create simple but highly effective elements. Imagine a cylinder based score readout that worked like a car milometer, or telescopic arms on screw-threads bringing in the status panel. The possibilities are endless!
Until next time, Happy Coding!
Download this tutorial and code.
From the Forums
Here is a selection of current hot topics worth checking out ...
Post your analog Desktop
This is a cool thread! Never mind the typical 'post your desktop' threads that surface now and again, full of little but geeky and/or breast bulging wallpapers - no, this time you have to post a photo of your actual desk! Some fascinating pics from your fellow coders. Some border on a call to environmental health, but most are great.
Grogs Keystate Map
Ok so this appeared ages ago, but I think its worth revisiting. Grog went and created a nifty graphic of a standard PC keyboard with all of the keystate codes on the keys. Very handy if you use them for key press detection, saves messing around printing out keystate values to the screen during your main loop!
MechCommander 2 Source
Despite this thread descending into anarchy (OnePost, give it a rest kid) it actually started out with an interesting note about Microsoft releasing the MechCommander 2 source code and media. Ok so its a 1GB download, but you can see how the pros make a game, and maybe learn an XNA trick or two in the process.
Dumbow and Cool
The recently re-named Dumbow (thanks Disney) and Cool has been getting some love and attention from developer Drew recently. New mini games including what looks like a nifty Kart racing game, a new level editor and now 100 levels of gaming action, make this well worth checking out.
Konvurd
This application allows users to import models in X, 3DS or DBO formats and then play the objects animation and see how it looks, rendered in DBPro. You can then export your object to DarkBASIC Professionals native 3D file format DBO. All this can be done using the nice and simple Windows interface.
Working Entities in Cinema 4D
If (like me) you use Maxons Cinema 4D to do all of your 3D work in, then this mini tutorial should be appreciated if you want to create entities for FPS Creator. It tells you the tools you need, as well as the process to go through, in order to get 3D objects out of C4D and into FPSC with as minimum fuss as possible. Bliss.
FPS Creator Newsfest

There have been a bunch of FPS Creator related items over the past month or so, so we've collected them together for you all here.
Game Cover v1.0
Game Cover is an application which allows you to include intro movies, title screens and developer logo screens with your FPS Creator Games. You can secify your own mpeg movie intro, and include your own company/community logo. It's a really simple program which has the potential to give your games or demos a nice meaty introduction sequence. It's free for use with your commercial and non commercial projects. Grab it from the authors web site
FPS Creator Tutor wanted in London
"My name is Tom and I run a comapany called RollingSound, We provide youth projects across London. One of which will be running this summer and will be taching a small group of young people how to make computer games using FPSC and or DarkBasic Pro. I need a tutor who would be willing to undertake this PAID work over the coming summer. Teaching experience would be useful but not essential. Please get back to me if you or someone you know would want to be involved in this unique project!
Crosshair Pack Release
Scott Taner of Tanner Products emailed us to say: "I've just completed a crosshair pack for FPSC that contains 40 crosshairs, a tutorial on how to get them into FPSC and instructions on where to put the crosshairs. Details and a promotional video can be found here. The pack costs £2 ($3.60 / €?2.90)
FPS Creator IRC Channel
For those brave brave souls out there you can join an FPS Creator related IRC channel on devhat.net. Connect to irc.devhat.netand join #fpsc. Good luck!
Ozark Games World War II Pack #1
This new pack contains 27 FPSC ready objects including ammo crates, oil barrels, cement barriers, A-Frames, pallettes, shipping crates and various other things. So if you've ever had an inkling to go totally crate mad in your game, this is the one for you! Texture maps are all 512x512 resolution, and the UV maps are also available (1024x1024). Pretty good for a shade under $9! Available from Ozark Games website
Magic FPS 2.1
We've featured this before, but here is a new update. It's an easy way to add your own custom hills, doors, and arches to your FPS Creator projects. The new version includes: Rooms, Flats, Walls, Signs, Curved Walls, Custom Boxes, Custom Cylinders, Doors, Arch segments and Hill segments. It includes a real-time 3D preview so you can see what you'll get instantly. More details from the website
E.C.S. Professional released!
E.C.S. Professional is a program that allows an entity to be created and FPSC ready in seconds. if you want a simple static entity, its as simple as loading the model and texture, and exporting. we have just finished a Video Tutorial where you can see how easy ecs pro is to use! Download from Seqoia Games
TGC Disclaimer: Please remember that The Game Creators provide newsletter information for your own use and do not support the products listed above. I.e. while we believe the traders to be responsible and honourable, we can't bail you out if they foul up an order.
Murkymedia.com Actor Pack

Murkymedia.com launches with FPS Created Ready Actor Pack & Assorted Freebies
If you've been looking for quality royalty-free custom content for FPS Creator, check out Murkymedia.com. We've just released an FPSC-Ready Actor Pack that comes with 16 SciFi themed characters, animated, textured and set up for use in FPS Creator.
The FPS Creator-Ready SciFi Actor Pack contains animated .x models & .dds maps, and comes with .fpe files and .bmp icons for easy and pain-free integration! You also get an extras installer which we've included for those who wish to modify the characters or use the meshes in other programs. This contains the character meshes in default pose in .x, .obj and .3ds formats and the UV reference images in .tga format for easy editing.
We're also working on a lot of new content to cater to DBPro users and the indie game community in general. Updates and new content are arriving fast. You won't want to miss what's coming next. Take a look at our collection of freebies as well. Royalty-free music, game loops and even a couple of free characters and a weapon all ready to run in FPS Creator.
For more information on Murkymedia and our stuff, visit www.murkymedia.com today!
20-Liner - 3D Flight Shooter

This 20-liner game is actually pretty cool. And it's amazing how this game has no media at all! It got a spaceship (that you control) together with enemy ships. The player ship has a fire effect following its tail ... Looks really good! And when you speed up, this effect gets more red, like if it gets warmer. You fly around with this spaceship, with a green terrain below you. There is tons of enemy ships in the air, so no relaxing moments! ;-) When you've flewed around for some time, you start to get a pretty big group of enemies following you!
The enemy also of course got an AI. And it isn't that dumb! But fairly simple. But still good enough to fit with the game. While I've been playing the game, it looks like they fly around when they can see you. If you get too close, they will start chasing you, and shooting on you. And they're pretty hard to get away from ;-) It's a fun game, and if the author takes the time to keep updating this game, it would have the potential to become a really good game, never mind a 20-liner! Review by The Nerd.
Get the source for this game here. The author wins any DarkBASIC Professional expansion pack of their choice, please email us to claim your prize.
Tech Tips - 3D Arcade Game Environments - by Grant Clark

After receiving requests for information on the landscape system used in Helios and SUBsurface I decided to go further than a simple tutorial and rewrote the original system as a set of functions, thus starting off a series on 3D arcade game environments. These functions allow you to get a scrolling landscape with convincing depth into your game easily. This will grow over the next few months to become a complete scrolling environment system, it'll include natural phenomenon like rain, snow, auroras, wind effects and debris, as well as a full compliment of in game effects for explosions and bonuses.
The whole system will rely on the functions that are in this months article. These functions will be updated as the system expands to include more features, but they can be used very effectivley in your games right now. The system requires a lot of media which is pre-made for you, but this can be tweaked or changed to suit your needs, and I'll be making several new landscape sets to go with updates to the system too, so by the end of this series of articles you will have lots of media to mix and match into new combinations for interesting environments.

How the system works
The approach taken here is the same as the techniques used for scrolling 2d tileset backdrops and scrolling messages, only this system can wrap and scroll in both directions at the speed of your choice, and uses several layers of meshes in a scroll and recycle arrangement, great for Defender and Choplifter syle games, but by no means limited to them. It's based on an arrangement of meshes that move past a static camera and get recycled when they reach a designated position. This is done by having 2 fixed wrapping points that exist offscreen, so you dont see where the landscape wrapping / recycling is being done. When the landscape is moving from right to left across the screen, each individual mesh is tested to see if it has passed the left wrap point, if this point is reached the mesh is moved to the correct distance behind the right most mesh in the chain of meshes. identical to a scrolling message or tile system. The correct mesh number for the last mesh in the chain is derived from simple logic and a neighbor policy, i'll explain this logic in the second part of this article next month in issue 41, for now we'll just concentrate on the basics, and how to get the system working quickly. So lets get stuck in and give you something to play with right away.
A demonstration
Included in the ZIP file, you'll find a demo.exe file that shows the landscape in motion. You can change the speed of the scrolling by using the cursor left and right keys. As you can see the landscape wraps nicley no matter what speed or direction the scrolling is moving, also the camera never moves left or right, it stays at X = 0.0, it's almost in the center of the scene looking along the Z or depth axis. the camera is automatically set up by the system so you don't have to worry about it. The FOV of the camera enhances the perspective shift of the landscape making it feel far deeper and more natural than is possible using traditional 2d tiles with parallax scrolling.

Our parallax is a by product of the system and really invisible as far as code is concerned. When you have played around a bit with the demo file, you might want to have a look at the functions that are used to drive it all, its sheer simplicity and can be implimented in a game in minutes. The source for the demo is there too so you can see just how easy it is to set up and operate, you should pay particular attention to how the lighting is set up in the init_environment subroutine (although its not part of the system, the lighting and environment setup is important or the landscape will have an odd or dull appearence.
Using it for yourself
Before you start, make sure you have the landscape folder with its contents inside your project folder(the landscape folder contains all the media that is needed for the system). Now copy and paste the functions into your code or #include them. When you have the code in your main program we're ready to begin. Also it should be noted that I have nominated objects 51000 - 51999 for this system, edit the setup subroutine if your requirements are different.
First we must prepare the landscape system for use, this subroutine sets up all the variables and loads all the media the system needs in a single go. It's also where the camera is setup giving the best view possible of the scene.
gosub landscape_setup
Once we have completed the initial setup we can go ahead and build the landscape, this single function will preapre the meshes for use. the meshes decrease in resolution the further thay are from the camera, this helps performance on slower cards.
landscape_build()
Now the landscape is ready for use, but by default it's invisible after building, so we have to use a command / function to make the whole thing visible to the camera and the user and be of any use. there is also a command / function to hide the landscape from view. a hidden landscape can still be updated.
landscape_show()
landscape_hide()
With the landscape now visible it's up to another function to update it's movement and wrapping ability, this function should be placed near the beginning of your main gameplay loop, it takes takes 2 parameters. The first determines the speed of the landscape movement, it should be specified using a real number, the value can be either positive or negative allowing for left and right scrolling. The second parameter determines if the landscape meshes have a random vertical scale applied to them when they are wrapped / recycled, values are 0 for no random scaling, 1 for random scaling.
landscape_update(landscape_scroll_speed#,randomize_on_recycle_flag)
the following commands / functions alter the appearance of the landscape.
landscape_wire_on()
landscape_wire_off()
These are used to change the landscape between wireframe mode and solid mode, the texture is visible on the wireframe and the default is wireframe off.
landscape_ghost_on(landscape_blend_mode)
landscape_ghost_off()
Use these commands to enable and disable landscape ghosting, ghosting in solid mode will producle slight seams at the mesh edges, it's best used in conjunction with wireframe mode to give a better look.
landscape_cull_on()
landscape_cull_off()
Use these commads in wireframe mode to render the backface poly edges of faces normally hidded by the direction of their normal. This helps reduce flickering in wireframe mode. the default is cull on.
landscape_random()
landscape_derandom()
These commands are used to randomize the vertical scaling of all meshes on the fly, or return them to the default vertical scaling factor.
The fuctions were designed with the purpose of being very easy to impliment, leaving you free to concentrate on making the actual game, the functions that will make up future components of the system will be equally simple to impliment. Newer users to DBP should find it fairly easy to use and help bring their games to life quicker. Changing the appearance of the textures requires you to edit the texture files in the landscape folder for the time being. By the time the system is complete, the landscapes will support building structures and water plains etc. If you follow the series, then you should gain a fair understanding of how to construct immersive 3d game environments for traditional style arcade games. Till next month, cheerio and have fun.
Till next month, Cya.
Download the tutorial and source code.
This months Winner
Each month we plcuk the email address of one lucky subscriber from the list, and award them with a free copy of DarkBASIC Professional. To claim it all you have to do is send us an email (from the winning email address, naturally) The winner this month is: philpye@??????????.co.uk
Outro
Share your news with over 12,000 active games developers!
If you have something you'd like featured in a future issue then please get in touch and include as much information as possible (including where applicable: screen shots, URLs and zip files).
Issue 41 deadline - May 30th.
")