If you cannot view this newsletter correctly, click here to view it online

Editorial - April 2013

Here in the UK, we have just passed through a most confusing weekend. A convergence of numerous events has left even the most organised of people bewildered. After a full moon on Wednesday, we have entered the Easter weekend, the first point in the year where getting away for a few days is practical and necessary for most. Easter being in March is disorienting enough (generally it is in April, only falling once in March in the next 10 years), but the arctic conditions have resulted in many parts of the country being inaccessible. My own journey home was halted a few days ago by a six foot wall of snow where I expect to see an open road. My colleague had to battle through 5 miles of knee-deep snow in rather fetching snow goggles simply to get essential food items (and wine). On Sunday the clocks went forward one hour, leaving us with less time to consume copious amounts of chocolate that is frankly an impossible challenge in a standard 24-hour day. April 1st is traditionally Fools' Day, but this year nothing will usurp the prologue in its ability to confound.
As coders and technophiles, we are more resistent to the unexpected. However, we all struggle to resist the onslaught of new gadgets, technology and everything it entails. This month we can anticipate the final strands of AGK 108 coming together and stabilising as we draw a line before any further advances catch the developers' attention. Lee continues to surprise us all with technologies not yet in the public domain. Our community amazes us with yet more major prize scoops in the international arena. Alongside,we have our usual collection of news and views to keep you entertained.
Until next time,

contents
(1) FPSC News (2) Ultimate Coder II (3) App Game Kit (4) Intel Winner (6) Topical Game (7) AGK Basics (8) App Developers Group (9) From the Forums (10) Facebook (11) The Game Creators News
FPSC Reloaded and Highly Explosive
By Lee Bamber

Each month we will be bringing you updates on the progress of FPS Creator Reloaded. You will find a running commentary on the development through the FPSC-R Blog, but right here you will find some of the selected highlights that deserve your utmost attention.
Explosive Action
Everyone loves a good explosion. The following video is a really good explosion, and it's still not complete. I have commissioned a secret FPSC ally to help me create the ultimate explosion for Reloaded. we're happy that the new FPSC Reloaded explosion will have a minimum of new and improved main blast decals, debris cast from the epicentre using physics for the larger bits, a slow lingering smoke after the initial blast and we're pencilling the concept of a slow burning fire to slowly fade away as the remaining fuel is consumed. It's not rocket science to add all these as most FPS games have had this for many years now and Reloaded should have no less. Once we have the basics in place, and looking awesome, we then turn it up to Eleven with what happens to anything nearby, from shock waves, object and character damage and reactions, scorching, subsequent explosions of nearby flammable objects, shader effects and some real meaty sound effects.
Expect more of the same in the final product, but better still. Watch the ferocity with which the flames appear, before lingering in the air as they dissipate. This is how the prototype started life:
This is where the explosion has progressed to now:
If you want to see how far technology has come, check out these exploding barrels from Quake II, which were cutting-edge in their time!
Let there be Light
We are now at the stage where the objects have been identified from the large map editor project and ready to be re-created in the smaller light mapping prototype. The fun process of lighting them in real time can begin, and once up and running, moved back into the main map editor source (which still takes 3 minutes to compile so I rather like the idea of working in the smaller prototypes which take 3 seconds to compile).
Awesome Artwork
Alongside the main project, there are many other things happening. One of those sub-projects is the artwork, including animated entities to bring the game to life. Here is a sneak preview of one such entity, a beautiful cascading waterfall.
DarkBASIC Professional Benefits
I posted in the DBP forum which I have probably not done for the best part of half a year, and removed the AGK post from the main DBP page as it did not seem appropriate. Initially I thought DBP fans would move swiftly to AGK but I have since appreciated that this will only ever happen if AGK had every command and every feature DBP presently has on Windows. The migration cost is too high right now, so I am going to do a little house cleaning on the DBP side of things and solve some issues as I write Reloaded, including the new tricky issues of Windows 7 and Windows 8 compatibility. Seems the powers that be have re-written the OS to forbid many things DBP wants to do, and given the OS won't budge, I'll have to contort our beloved language to suit. Thanks again Microsoft! :-)
Prototypes for the Pledgers
The good news for those who are pledging funds into the Reloaded project, once I start spitting out the smaller prototypes, I will make them available so you can get an early taste of the final product. I think the terrain and new physics prototypes will be well worth waiting for.
![]() Keep reading Lee's Blog for the very latest updates on the progress of FPSC Reloaded.
Keep reading Lee's Blog for the very latest updates on the progress of FPSC Reloaded.
Make your Pledge to the Project
FPSC Reloaded is underway and will be with our diehard fans and newcomers in 2013. But we still want your support to reach some ambitious but incredible stretch goals to implement even more fantastic features. Pledgers have already committed £8902.32 to the project, closing in on the project's first stretch goal!
Already, FPSC Reloaded will incorporate new or improved:
- Terrain
- Physics
- Advanced AI
- Weapon enhancements
- Game play features
- High quality characters
- Advanced graphics engine
- Game HUDs
- Game Runtime engine
- Sound & Music
![]() In order to fulfill our stretch goals we are now offering avid FPSC users a way to get involved in FPSC Reloaded with our own internal TGC pledge system.
In order to fulfill our stretch goals we are now offering avid FPSC users a way to get involved in FPSC Reloaded with our own internal TGC pledge system.
We have kept it simple and are offering a single pledge amount of $80. Just like Kickstarter, your pledge will be used to help pay for the development and entitles you to a few gifts.
These pledges will go towards the development of demo assets and media and also new features when we raise enough through this way. This list includes:
- Inventory system
- Particle weapons.
- Improved AI Sound Detection
As further pledging milestones are reached, you can expect to see Tree Systems, Entity Reflections, Entity and Icon Makers, Water/cloth physics, road painting, vehicles, additional game modes and more.
If you choose to back us and pledge we can offer you the following:
- Access to Beta versions of FPS Creator Reloaded as and when we make them available
- Priority shipment of the physical product to you
- Your name in the credits role
- Ten awesome model packs:
Model Pack 29 - Tropical Foliage Pack
Model Pack 30 - Middle East Pack
Model Pack 32 - Office Pack
Model Pack 34 - Industrial Pack
Model Pack 37 - Castle Pack
Model Pack 38 - Metro Theatre
Model Pack 39 - Zombie Apocalypse
Model Pack 50 -Dungeon Pack
Model Pack 57 - Zombie Apocalypse 2
Model Pack 52 - Viral Outbreak
![]()
Please pledge today!
* You will receive the model packs as soon as your order is processed.
* FPS Creator Reloaded is not due to be completed until October 2013.
* New stretch goals may not be available until sometime after October 2013.
The Perceptual Conversion of 7 Ultimate Coders

The Ultimate Challenge. Seven developers compete for seven weeks to create apps that utilize the latest Ultrabook convertible hardware along with the Intel Perceptual Computing SDK and camera to build the Ultimate app prototype.
 In the last newsletter, we left Lee two weeks into his challenge, having made serious progress into virtualising himself through the gesture camera. We had a sneak preview of a 3D avatar starting to take shape in real-time, with facial features and hands becoming recognisable. With a few more weeks of development completed, where is Lee now? Is he at his desk, or transported into a virtual world in the ether?
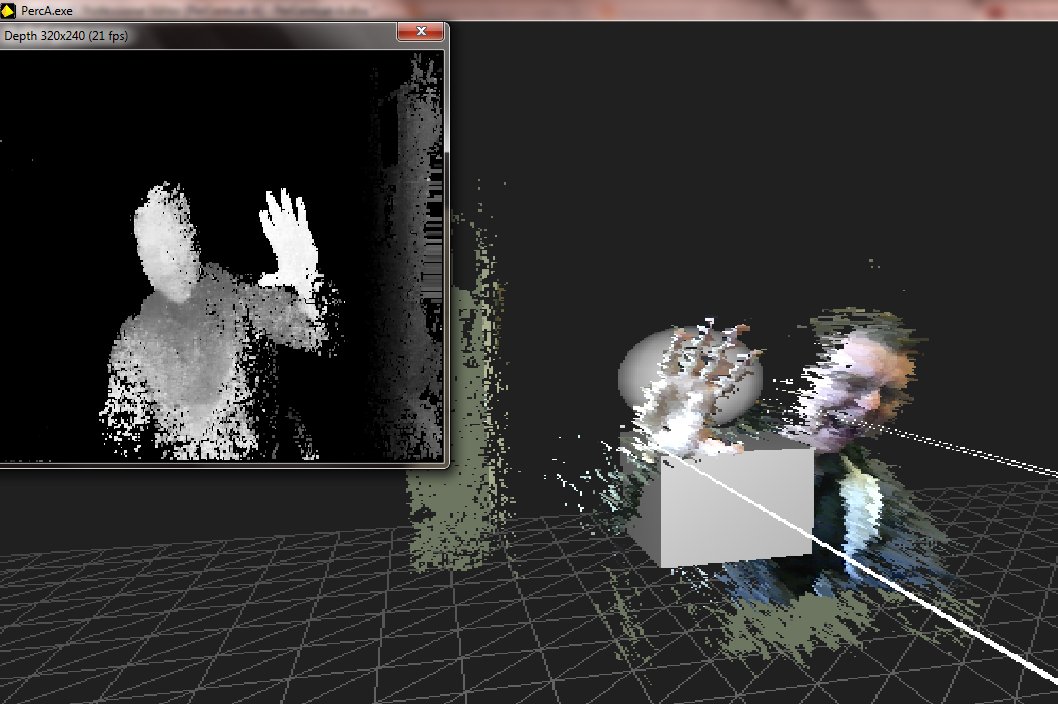
In week three Lee did indeed leave his real office and appeared in avatar form in a virtual office. In this first public demonstration it is incredible to see the real man in an unreal setting, and the camera panning around the room to emphasise the transformation. There is work to be done at this stage, but the technological leaps already made are astounding. The avatar is no longer attached to the background, and every object is now in its rightful place. The camera panning is controlled by the head movement, emulating the ability to look around a room and take in the scenery and other occupants.
Data depth has created a strange fuzz around moving objects. As Lee explains in the video blog below, defeating this has absorbed a lot of time and energy, and the application will take a creative detour around this issue, and embed it as a feature of the holographic characters. It's important to understand that Lee has - in his usual style - ventured into unknown territory and discovered issues that were not thought about until this adventure commenced.
The Gaze Algorithm
On a similar trek, Gaze Detection has been conceived, possibly the first ever appearance of this concept which allows the camera to look around the room. Here is the algorithm used for anyone wanting to try out something similar:
- Find the furthest depth point from the upper half of the camera depth data
- March left and right to find the points at which the ‘head' depth data stops
- Now we know the width of the head, trace downwards to find the shoulder
- Once you have a shoulder coordinate, use that to align the Y vector of the head
- You now have a stable X and Y vector for head tracking (and Z of course)
- Scan all the depth between the ears of the face, down to the shoulder height
- Add all depth values together, weighting them as the coordinate moves left/right
- Do the same for top/bottom weighting them with a vertical multi-player
- You are essentially using the nose and facial features to track the bulk of the head
- Happily, this bulk determines the general gaze direction of the face
- You have to enhance the depth around the nose to get better gaze tracking
The app quickly progressed into conference calling with two attendees. The style is very similar to a standard call, with your partner on the main screen and yourself in a mini window in the corner. Where it differs is in the 3D office environment that the avatars are projected into. It also caters for 2D cameras, whereby a 2D screen is put in place of the 3D avatar. It also allows for a shared notepad, and Lee's video demonstrates a game of noughts and crosses on the conference room table.
Nothing but a Wireframe Model
Optimising such complex, real-time processes requires creative and lateral thinking. Having created a live 3D avatar that must be regenerated 30 times a second takes a lot of processing power and bandwidth. If you were to texture the model each time as well, transistors are going to start fizzing and popping. Additionally, consider the challenge of wrapping a 2-D video around your 3D model, and matching it up; it just doesn't add up.
There is a simple answer. Lee has packed in so many polygons to the model that it is verging on a full skin of vertices. By applying the diffuse values of the incoming stream to each vertex, it becomes a textured and very detailed clone of the real thing.
Listen To Me
Until now the perceptual concepts have been around video and gestures. What has been overlooked - until now - is audio commands. In week 5, it became possible to talk to your Ultrabook and control it without touching the keyboard. In theory you can now conference call simply by sitting in front of your laptop, talking and gesturing. Of course, you can also talk to your conference guests too.
Lee offers some sound advice regarding voice recognition. When your application vocabulary is limited, you can take the option to allow numerous words result in the same action. This does not mean "STOP" and "END", but the incorrectly identified alternatives. For example, the word CALL returns a dictionary of the following possible hits:
- call
- count
- carl
- quote
- account
Because the app does not need to recognise the word CARL, it can be marked as a successful hit for the command to CALL. It is also prudent to avoid words with too many hits in the dictionary. For example, the word RETURN provides the follwoing dictionary, which is clearly too much to handle:
- return
- written
- what time
- we touch
- with
- the time
- to time
- witch
- time
- me tan
- button
- mountain
- what's up
- mattoon
- ritson
- mention
- witch in
- motel in
- which
Data Streaming to Many Devices
Optimisations have been made to ensure the most essential component of conference calling is feasible. The data that is being transmitted has been streamlined, and the balance between quality and usability has been found.
The final application should be cross-platform compatible, as are the majority of applications from The Game Creators laboratories today. Lee has battled with numerous devices to ensure the new functionality will run seamlessly across platforms.
![]() To read the full articles and watch the accompanying videos, go to Lee's blog. You'll find lots of demos, code snippets and many hints and tips for budding perceptual coders.
To read the full articles and watch the accompanying videos, go to Lee's blog. You'll find lots of demos, code snippets and many hints and tips for budding perceptual coders.
AGK Roundup

Version 108 of App Game Kit (AGK) has been in Beta for some time. As well as all of the requested fixes and features, the industry has been moving at an incredible pace and it has been a challenge to find a fixed point to aim at in terms of new functionality. Finding the fulcrum between a full release, and ensuring our community of developers don't miss out on the current trends is a fine balance.
The Game Creators have also been busy developing applications with Focus Multimedia and this work has improved the AGK engine and often expanded it with new commands.
![]() We are now in a position to set in stone the functionality of version 108. Paul is working through the final bugs and issues; if you are subscribed to any of the threads in the issues list you may have noticed some activity on these in the past couple of weeks. You'll also find that beta 9 is now in your account downloads if you are an AGK owner.
We are now in a position to set in stone the functionality of version 108. Paul is working through the final bugs and issues; if you are subscribed to any of the threads in the issues list you may have noticed some activity on these in the past couple of weeks. You'll also find that beta 9 is now in your account downloads if you are an AGK owner.
AGK Snippets
Do you have any AGK code snippets that you would like to share with the community? We're building a collection of useful code samples that showcase individual features of AGK. This will help new and existing users get to grips with all areas of the AGK engine.
Follow the forum thread to learn more about AGK and if you can, please submit your own snippet of code advice. TGC will be adding a whole section to the AGK web site where these snippets will be easy to access and read. In the meantime, here are a few of the current additions. Each of them is a standalone piece of code, so you can run it and witness the results immediately.
Hyperlink Text
Did you know you can launch a browser directly from your AGK app? This snippet uses the Text Hit functions to detect a user click, and then convert the action into the opening of a browser window. Run the program, click the text, and watch your browser open with the intended web page. This is useful for directing your users to your own website for additional information. The ideal use is to provide help manuals that are too large to incorporate in the game itself.
rem Landscape App
SetDisplayAspect( 4.0/3.0 )


rem create a string containing the URL
url$ = "//www.thegamecreators.com/"

rem create a text object
textID = createText( url$ )

rem Main game loop
do
    rem wait for a click / tap event
    if getPointerPressed()>0

        rem now check if the text is under the click event
        if getTextHitTest( textID, getPointerX(), getPointerY() ) > 0

            rem open the browser using the url text string
            openBrowser( getTextString( textID ) )

        endif

    endif

    rem update and render
    Sync()
loop
Date and Time
There are now numerous commands that can be used to serve the current date and time. Do not underestimate how important it can be to your audience to have a sense of time (how often have you checked today?) It is also essential for recording high scores and progress.
rem print time data to screen
do

    print("Date: "+GetCurrentDate())
    day = GetDayOfWeek()
    select day
        case 0 : dayAsString$ = "Sunday"    : endcase
        case 1 : dayAsString$ = "Monday"    : endcase
        case 2 : dayAsString$ = "Tuesday"   : endcase
        case 3 : dayAsString$ = "Wednesday" : endcase
        case 4 : dayAsString$ = "Thursday"  : endcase
        case 5 : dayAsString$ = "Friday"    : endcase
        case 6 : dayAsString$ = "Saturday"  : endcase
    endselect
    print("Day : "+dayAsString$)
    print("Time: "+GetCurrentTime())
    sync()

loop
Particle Effects
The power of particle effects is immense, yet many coders are a little afraid of their complexity. Once broken down into a step by step configuration, it is clear that they are not as complex as might be first thought. Yet the results can be fantastic. The following snippet shows the step by step creation of particles that change colour, fade and radiate over time. Toning down this example, and applying a blurred image can create a great smoke effect.
rem Landscape App
SetDisplayAspect( 4.0/3.0 )

rem create a particle emitter
particlesID = CreateParticles( 50, 50 )

rem set the emitter creating particles
`freq is the number of particles created per second
freq = 50
size# = 2.0
SetParticlesFrequency( particlesID, freq )
SetParticlesSize( particlesID, size# )

rem set particles to fade out over 3 seconds from red to blue
SetParticlesLife( particlesID, 3.0 )
`Start color
red = 255 : green = 0 : blue = 0 : alpha = 255
AddParticlesColorKeyFrame( particlesID, 0.0, red, green, blue, alpha )
`Finish color
red = 0 : green = 0 : blue = 255 : alpha = 0
AddParticlesColorKeyFrame( particlesID, 3.0, red, green, blue, alpha )

rem Main game loop
do
    rem set to the mouse / touch position
    setParticlesPosition( particlesID, getPointerX(), getPointerY() )

    rem update the emitter using the length
    `of the previous frame
    UpdateParticles( particlesID, getFrameTime() )

    rem update and render the scene
    Sync()
loop
Loading User Images
Allowing the user to select an image is extremely easy. Let them load in their own avatar, or incorporate photographs into your app. You can use the resize, scale and saving commands to take the hard work of finding a suitably sized image away from the user.
rem First open the image select screen
ok = ShowChooseImageScreen()

if ok = 1
    rem now wait for the image to be chosen
    while IsChoosingImage() = 1
        sync()
    endwhile

    rem get the image but check that one was chosen
    imageID = GetChosenImage()
    if imageID = 0
        message( "No image chosen" )
    else
        message( "Image ID: " + str(imageID) )
    endif
endif
![]() Join in the forum thread to add your own snippets or find more like these demonstrated here.
Join in the forum thread to add your own snippets or find more like these demonstrated here.
The Success Story Continues...with another $20,000 Win
"...expect the unexpected, and share in each other's successes along the way. The whole community has proved that together we can do great things, so let's keep doing it!"
Steve Vink, TGC Newsletter Editor, January 2013


Matty H has excelled once again, taking the $20,000 prize in the Intel Perceptual Coding Challenge. As a grand prize winner he was one of 4 coders who were ahead of a 1,000 strong field of competitors. The latest success follows Bomb Breaker, which also won Matty numerous prizes in the previous Intel contest.
Mystic Blocks is a Puzzle game which takes a steady hand, quick reactions and a good memory. You are presented with a lock and a key, the key may only be a basic shape at first, a cube perhaps; you must rotate the key with hand gestures until it matches the approaching locks.
Many locks will pass, you must remember the sequence since the second time around you will not be able to see the shape of the approaching lock, if you can successfully repeat the sequence you may progress to become the mystic blocks champ!. You can alter the view to get a better look at what is approaching by moving your head side to side or up and down.
Planned features include face and voice recognition, the game will recognise who is playing and allow that player to continue with their progress. voice commands may also be used to speed up or slow down the game, allowing higher scoring if you can handle the speed.
Mystic Blocks utilises the perceptual camera to control the game environment, in your attempt to successfully rotate blocks to match the patterns presented to you. Anyone familiar with the UK game show Hole In The Wall will be familiar with the concept, although in Mystic Blocks you stay dry! Featured below is Matty's prototype, where you can see him moving the block with his hands, and the screen by his head movements. All of this is being achieved using AGK (Tier 2) and the Intel Perceptual SDK.
Magic Doodle Pad
Matthew Pilz is another of our successful community members. A $10,000 winner from the previous competition with Ballastic, Matthew has also won $20,000 in this competition. The nature of the application has meant that it is created in an alternative language, though we are always supportive of our community as they spread their wings.
Horse Meat Inspector
 In light of the recent unbridled disaster around horse meat, the next game out of the TGC stables just had to be around this theme. The team were convinced we were flogging a dead horse, but we have galloped ahead with the development anyway. Simply add the game to your cart in the Google Play store, and you're off!
Keep racehorses and pet ponies out of the burger production lines as you play as a meat inspector in this topical Android game.
Scan the burgers as they pass and if you spot one with a hint of horse then tap it to make sure it doesn't end up in a kids school meal or on the shelf of a popular supermarket. The management will allow the odd burger to get past you but fail three times and it's game over and you'll be sacked.

![]() So come on and help preserve the country's beef credibility. Will you be the best inspector?
So come on and help preserve the country's beef credibility. Will you be the best inspector?
The app has been developed using App Game Kit and is now also available on iPhone devices and iPads.
Getting Started with AGK
After entering the Intel AppInnovation Contest, I realised that one of the barriers to new programmers is one of frustration, and wanting to see results. To a seasoned programmer, it is accepted that the first signs of life from an app do not materialise for a long time, and this is difficult to overcome as a new coder. To alleviate the frustrations, this article cuts the code down to the bare bones, and lets you just play with the sensor commands in AGK.
Introduction
Developers of games are just like gamers - sometimes they just want to have fun. Forget complex configuration, endless how-to screens and a myriad of options, just show me the Play button! Even those that don't have this urge sometimes need a quick proof of concept before immersing themselves in a complex project. This is so much more important when dealing with new technology. It's all too easy to throw something together just to use new tech, and this would be the easy option for gyroscopes, light sensors , geolocation and all of the other fantastic new toys at our disposal. If you don't believe how easy it is to fall into this trap, I suggest you watch Snakes on a Plane before reading on ("We can make CGI Snakes, let's make a squamata film quick!"). Let's take a look at how we can rapidly test our ideas for usability and maybe even use the same process to complete a commercial application.
During the AppInnovation Contest, a small tribe of game coders used a lesser-known language called App Game Kit (AGK). It arrives on your desktop in two flavours, namely C++ and the proprietary Tier 1 language. Consequently, it caters for everyone from the beginner to the wisest of C++ gurus. Before you dismiss this language as just another breakaway sect attempting to dominate the programming landscape whilst fending off the jaws of Microsoft, Oracle et al, let's take a look at the stats in terms of the AppInnovation contest (or at least the known stats from the AGK community):
- 14 Ultrabook recipients
- 9 of the first 50 Apps submitted
- $10,000 winner in the Gaming category
All in all, that is just short of 5% of the Ultrabooks, 18% of the first 50 apps submitted and 14% of the finalists!
I digress, the point of this article is to show you how you can just play. It's the "first 50" statistic that shows how easy it can be to get your app or game up and running in a short space of time, so let's look at how this encompasses the Ultrabook sensor features. If you want to play along, you can grab the AGK trial version which creates watermarked executables for Windows.
We will be using Tier 1 for simplicity, I will show you how this ports to C++ at the end of the article.
Hello Ultrabook World
We'll start by creating the simplest of programs, outputting text to show the status of the sensors. That is:
- Do they exist?
- What are they telling us?
Do any sensors exist?
We have 8 sensors to consider:
- NFC (Near Field Communication)
- Geolocation
- Compass
- Gyrometer
- Inclinometer
- Orientation
- Light Sensor
- Multitouch
In AGK Tier 1, we can set an integer switch to 0 or 1, with just one command each. The variables do not need to be defined, the following lines of code are our very first lines in the program:
s1 = GetNFCExists ( )
s2 = GetGeolocationExists ( )
s3 = GetCompassExists( )
s4 = GetGyrometerExists( )
s5 = GetInclinometerExists ( )
s6 = GetLightSensorExists ( )
s7 = GetOrientationSensorExists ( )
s8 = getMultiTouchExists( )
As you can see, all of the functionality required to detect the sensors is wrapped up in simple commands. To make these useful to us, the next step is to print them to the screen. There are numerous ways to change the screen size, resolution and so forth, but for the time being we'll just take the default resolution of 640x480.
do
    print(" Sensor NFC : " + chr(9) + str(s1))
    print(" Sensor Geo : " + chr(9) + str(s2))
    print(" Sensor Compass : " + chr(9) + str(s3))
    print(" Sensor Gyro : " + chr(9) + str(s4))
    print(" Sensor Inclinometer : " + chr(9) + str(s5))
    print(" Sensor Light : " + chr(9) + str(s6))
    print(" Sensor Orient : " + chr(9) + str(s7))
    print(" Multitouch : " + chr(9) + str(s8))
 Sync()
loop
You may notice this is beginning to look a lot like Basic, and in fact you would not be too far from the truth. In reality, however, this will compile down to some very complex C++ methods and supporting framework behind the scenes. Keeping with the program, you can no doubt visualise a black DOS-like screen, with 8 rows of white text all displaying the values of the variables we defined. Let's realise that vision:
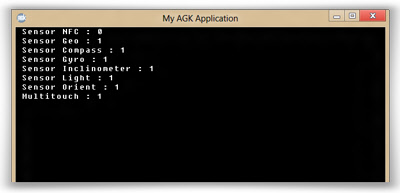
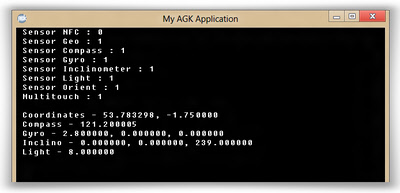
Behind these sensors - now that we know which ones we can interrogate further - are a set of parameters that flesh out the detail in these useful little devils. Let's interrogate these too, this time we'll simply include the function calls in the print statement itself. We'll check out the Geolocation, Compass, Gyrometer, Inclinometer and Light meter. In fact, we'll do all 12 parameters across 5 sensors in just 5 lines of fairly simplistic code.
if s2 = 1 then print("Address - " + getRawGeoCity() + ", " + getRawGeoState() + _
  ", " + getRawGeoCountry() + ", " + getRawGeoPostalcode())
if s3 = 1 then Print("Compass - " + str(GetRawCompassNorth(0)))
if s4 = 1 then Print("Gyro - " + str(GetRawGyroVelocityX()) + ", "  + _
  str(GetRawGyroVelocityY()) + ", " + str(GetRawGyroVelocityZ()))
if s5 = 1 then Print("Inclino - " + str(getRawInclinoPitch()) + ", " + _
  str(getRawInclinoRoll()) + ", " + str(getRawInclinoYaw()))
if s6 = 1 then print("Light - " + str(getRawLightLevel()))
Let's drop this extract into the code we created earlier, and just play, the following code is a full program that will run as a standalone Ultrabook App: s1 = GetNFCExists ( )
s2 = GetGeolocationExists ( )
s3 = GetCompassExists( )
s4 = GetGyrometerExists( )
s5 = GetInclinometerExists ( )
s6 = GetLightSensorExists ( )
s7 = GetOrientationSensorExists ( )
s8 = getMultiTouchExists()
do
print(" Sensor NFC : " + chr(9) + str(s1))
print(" Sensor Geo : " + chr(9) + str(s2))
print(" Sensor Compass : " + chr(9) + str(s3))
print(" Sensor Gyro : " + chr(9) + str(s4))
print(" Sensor Inclinometer : " + chr(9) + str(s5))
print(" Sensor Light : " + chr(9) + str(s6))
print(" Sensor Orient : " + chr(9) + str(s7))
print(" Multitouch : " + chr(9) + str(s8))
if s2 = 1 then print("Address - " + getRawGeoCity() + ", " + getRawGeoState() _
+ ", " + getRawGeoCountry() + ", " + getRawGeoPostalcode())
if s3 = 1 then Print("Compass - " + str(GetRawCompassNorth(0)))
if s4 = 1 then Print("Gyro - " + str(GetRawGyroVelocityX()) + ", " + _
str(GetRawGyroVelocityY()) + ", " + str(GetRawGyroVelocityZ()))
if s5 = 1 then Print("Inclino - " + str(getRawInclinoPitch()) + ", " + _
str(getRawInclinoRoll()) + ", " + str(getRawInclinoYaw()))
if s6 = 1 then print("Light - " + str(getRawLightLevel()))
Sync()
loop
On running this compact program, you can turn your Ultrabook, tip it, sway it and shine an interrogating light into it's sensors whilst watching the values change on screen. Our code is already alive!
Playing with the Big Boys
Now we've laid out the rules of the playground, we can make the sensors do some cool stuff. After all, the sensors are simply a means to bigger and more innovative creations! Let's see how we can throw a few sensors into a simple app.
Multitouch
We can establish from the existing code whether multitouch exists. Alongside this, the remaining code to handle the touch events is all wrapped up in a number of commands including:
- getRawTouchCount()
- getRawFirstTouchEvent()
- getRawNextTouchEvent()
- getRawTouchCurrentX()
- getRawTouchCurrentY()
- getRawTouchReleased()
To demonstrate a simple but effective use of this, let's create lots of physics-enabled balls, and let's do it in under 50 lines of actual code. We'll be taking advantage of the commands mentioned here, along with the built-in sprite and Box2D functionality that will allow us to create sprites rapidly, give them a little mass and bounce, then drop them into the world wherever we multitouch. If you are dexterous enough you'll be able to create 5 balls simultaneously. The code below introduces a number of other concepts found in AGK, but anyone familiar with Basic will be able to interpret.
SetVirtualResolution(1440,720)

` *** Check that the sensors we need are available
if getMultiTouchExists() = 0
    message("This app requires Multitouch")
    end
endif

` *** Define our variables
dim arrSprite[100] as integer
global spriteCount as integer

` *** Load the resources
imgTouch = loadImage("touch.png")
imgBall = loadImage("ball.png")

` *** The main loop
do

    ` ********************************************
    ` *** Deal with the multitouch events
    ` *** Monitor new and existing touches
    ` *** Covert ended touches to balls
    ` ********************************************

    touchCount = getRawTouchCount(1)
    if touchCount > 0
        i = getRawFirstTouchEvent(1)
        while i > 0
          if getRawTouchValue(i) = 0 and spriteCount < 100
              ` Create a sprite for any new touch event
              spriteCount = spriteCount + 1
              spr = spriteCount
              arrSprite[spr] = createSprite(imgTouch)
              setSpritePhysicsOn(arrSprite[spr],2)
              setRawTouchValue(i, spr)
              setSpritePositionbyOffset(arrSprite[spr],getRawTouchCurrentX(i), _
                getRawTouchCurrentY(i))

           elseif getRawTouchValue(i) > 0
              spr = getRawTouchValue(i)
              ` *** Move the sprite to the current touch event position
              setSpritePositionbyOffset(arrSprite[spr],getRawTouchCurrentX(i), _
                getRawTouchCurrentY(i))
              ` *** If the touch has ended, deleted the touchmark, and _
              ` *** create a physics ball
              if getRawTouchReleased(i)
                  deleteSprite(arrSprite[spr])
                  arrSprite[spr] = createSprite(imgBall)
                  setSpriteColor(arrSprite[spr], 128 + random(1,128), 128 + _
                    random(1,128), 128 + random(1,128),255)
                  setSpritePositionbyOffset(arrSprite[spr],getRawTouchCurrentX(i), _
                    getRawTouchCurrentY(i))
                  setSpritePhysicsOn(arrSprite[spr],2)
                  setSpritePhysicsRestitution(arrSprite[spr],0.7)
                  setSpritePhysicsMass(arrSprite[spr],_
                    getSpritePhysicsMass(arrSprite[spr]) * 5)
                  setSpritePhysicsImpulse(arrSprite[spr],getSpriteX(arrSprite[spr]),_
                    getSpriteY(arrSprite[spr])-10,0,100)
              endif
            endif
            i = getRawNextTouchEvent()
        endwhile
    endif
    sync
loop

end
Inclinometer
Now we have some physics-enabled bodies on the screen, let's mess with gravity. Box2D has the ability to change the impact and direction of gravity, and in just a few lines of code we can use this to react to the inclinometer in real time. Just 12 coding statements inserted into our main loop can achieve this, by implementing the Roll and Pitch parameters of the inclinometer:
   ` ********************************************
    ` *** Use the inclinometer to Change Gravity
    ` ********************************************
    Print(" Inclino - " + str(getRawInclinoPitch()) + ", " + str(getRawInclinoRoll()) _
      + ", " + str(getRawInclinoYaw()))
    if getRawInclinoRoll() <> fRoll#
        chg = 1
        fRoll# = getRawInclinoRoll()
    endif
    if getRawInclinoPitch() <> fPitch#
        chg = 1
        fPitch# = getRawInclinoPitch()
    endif
    if chg = 1
        setPhysicsGravity(fRoll# * 10, 50 + (fPitch# * 2))
        chg = 0
    endif
We now have our balls rolling around in a shoe box which we can pick up and move around. Tip it left and right to roll the balls sideways, and back and forth to change the gravity imposed on the bodies.
Light Sensor
While we are on a roll with ridiculously simple implementation of functionality, let's add the light sensors. In my little demo here, we'll include a backdrop that reacts to the light. We'll load the backdrop image, assign it to a sprite and make it 100% transparent. As the program starts, we'll also record the light level and use this as normal. All of this (all 6 commands!) slips in prior to the program main loop.
` *** Load the Backdrop image
imgBackdrop = loadImage("backdrop.jpg")
` *** Create the Backdrop image and make it transparent
sprBackdrop = createSprite(imgBackdrop)
setSpriteDepth(sprBackdrop,12)
setSpritePosition(sprBackdrop,1,1)
setSpriteColorAlpha(sprBackdrop,0)

` *** Record the ambient light
fLightLevel# = getRawLightLevel()
Now within our main loop, we'll add one more routine to check the light level and do some simple mathematics to fade the backdrop in and out as the light drops.
` ********************************************
` *** Check the Lightmeter and introduce stars
` ********************************************
oldLightLevel# = newLightLevel#
newLightLevel# = 1 - (getRawLightLevel() / fLightLevel#)
if newLightLevel# > 1 then newLightLevel# = 1
if newLightLevel# < 0 then newLightLevel# = 0
newLightLevel# = (newLightLevel# + (oldLightLevel# * 20)) / 21.0

setSpriteColorAlpha(sprBackdrop, newLightLevel# * 255)
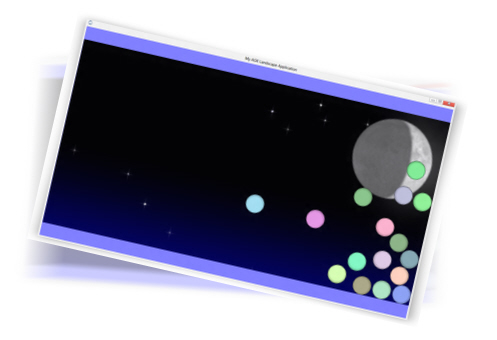
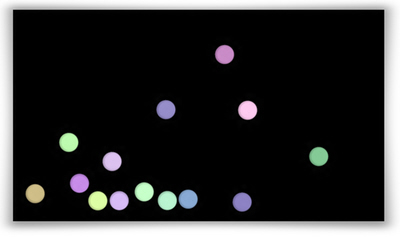
The screen is tipped and the light sensor dimmed
That really is the simplicity of rapid testing of the technology. I'll admit, a few spheres on a fading background is not going to be the next big hit. But at least I now know it, and it took less than 20 minutes to realise.
![]() You can download the three stages of this project here, which includes the executables for anyone without the tools. At the time of writing (March 2013) The Game Creators are completing the beta of version 1.08, and the sensor functionality will be available in the free trial version soon after. All of the AGK based entries were built using Beta 1.08, and were successfully submitted to the AppUp store.
You can download the three stages of this project here, which includes the executables for anyone without the tools. At the time of writing (March 2013) The Game Creators are completing the beta of version 1.08, and the sensor functionality will be available in the free trial version soon after. All of the AGK based entries were built using Beta 1.08, and were successfully submitted to the AppUp store.
Further References and Examples
C++
We mentioned C++ earlier as the second option. Here is a quick example of using the AGK library which plays a sound and draws an image when the screen is pressed:
#include "agk.h"
void agk::Begin ( void )
{
   agk::LoadImage ( 1, "sprite.png" );
   agk::LoadSound ( 2, "beep.wav" );
}
void agk::Loop ( void )
{
   if ( agk::GetPointerPressed()==1 )
   {
      agk::PlaySound ( 2 );
      int iThisSpriteIndex = agk::CreateSprite ( 1 );
      agk::SetSpritePosition ( iThisSpriteIndex, agk::GetPointerX(), _
        agk::GetPointerY() );
   }
}Sensor Panel
Lee Bamber created a Sensor Panel for the AppInnovation Contest. You can read about this here, including a full suite of code which encompasses all sensors. You can see how a full application can be quickly created with a number of graphical commands, bitmap text and simple animation techniques. Search "Sensor Panel" in your AppUp Store to download it for free, and watch your Ultrabook spring to life.
App Developers Group - Algorithms And Efficiency

The editor of The ADG Newsletter, Adam Hodgson, continues to share his knowledge of the pearls of wisdom that make good coders into brilliant coders.
Hash Tables
by Adam Hodgson
The Hash Table is one of my favourite data structures and not just because it sports a cool name. A Hash Table is an associative array which means that the values to be entered into the array are associated with a unique key. The key is equivalent to an index in a normal array - you can't have two items in an array with the same index. The brilliance of Hash Tables is that the user doesn't have to worry about or manage the indices, the Hash Table does it all for you while attempting to maintain the same or slightly slower speed.
Picture a game where a mob of 100 sprites are bouncing around the screen. As the user clicks on or touches the individual sprites, they explode. A basic implementation of this would be to store the sprites in an array. The question is - how do you tell which sprite has been clicked? The language you use may return a sprite number but how do you then find the corresponding entry in your array? Sure enough you can search your array in this situation and CPUs nowadays are quite fast and powerful. However, looking at the numbers it would take on average 50 iterations of a loop to find each sprite. Now add sound, music, backgrounds and graphical effects to your game. As you can see it is important to save on processing where we can. What if we could find the corresponding index almost instantly, or maybe only after a couple iterations without regard to what order the sprites are in? This is where the Hash Table comes in.
The way a Hash Table works is that when you add an entry with a unique key, it will ‘hash' the key i.e. calculate an index based on the key and then insert the entry into the array at that index. A common way to generate the indices is to use the Multiply, Add and Divide (MAD) method. This generally takes the form ( (ai + b) % p) % n, where i is the key, n is the capacity of the Hash Table, p is a prime number greater than n and both a and b are random numbers chosen between 0 and p-1. Variables a and b should only be chosen upon creating the hashset and/or resizing it, not upon every call of the hash function. This is because when it comes to retrieving an entry, you'll need the same index generated and hence the same a, b values when it was inserted.
Hash Tables come in many forms and the main difference revolves around how collisions are handled. A collision occurs when two different keys produce the same hash value. Although this is unlikely, it's not impossible and so we must have a way of dealing with such occurrences. Two common ways of handling collisions are separate chaining and linear probing. Separate chaining involves storing entries with equal hash values in ‘buckets' (an array or linked list). This in turn requires a search of the bucket for a match when retrieving or deleting an entry. Linear probing simply involves finding the first free spot after the location of the collision and this is the method we will be looking at.
Linear Probing - inserting 6 when it gives a hash value of 2:
[1] [ ] [4] [2] [3] [5] [6]
0   1   2    3   4    5   6
     6-> -> -> ->6
When discussing data structures, it's helpful to look at a summary of the running times of the various operations the data structure uses such as insertion, retrieval and deletion. These are the ones we are going to focus on.
Operation Expected Time Worst case
- Insertion O(1) - no searching O(n) searches a number of entries
- Retrieval O(1) O(n)
- Deletion O(1) O(n)
All of the above operations have the same running time, because they all revolve around a similar process - find the entry (or place to insert) based on the given key and then perform said operation on it. Since Hash Tables are array based, we ‘expect' to insert, retrieve and delete without any, or very little searching. Due to collisions, we may have to search for the entry matching the given key however, the entries should be fairly spread out meaning that we don't need to search far but only a small fraction of the number of entries.
Now that we have established how Hash Tables work and what's expected of them, we need to look at how to use them to our advantage. To save you the trouble of writing one, an App Game Kit (AGK) implementation of a hash table can be found here. This comes with a small demo on how to make use of hash tables and we're going to run through it.
You will see below all of the Hash Table necessities, a Sprite type along with a sprites[] array followed by a for loop to initialise the sprites[] array. The line of interest in the for loop is:
addIntegerToHashSet(Sprites[n].spr,n)
As sprite numbers in AGK are unique, this uses the sprite number as a key and inserts the value of n into the Hash Table. Since n is the position of the sprite in the array it is of interest and we can later retrieve this.
In the main loop, you'll see a few conditions which basically print a sprite's details (just to prove that we have the right sprite) if we hover the mouse over it. We can also create and delete sprites. The genius of the Hash Table is shown in these few lines:
hit = GetSpriteHit(getPointerX(),getPointerY())
    if hit

      index = getUserDataFromHashset(hit)
      print("Hash Spr: " + str(Sprites[index].spr) + "   " + _
         "AGK Spr: " + str(hit))
      print("Hash red: " + str(Sprites[index].red) + "   " + _
         "AGK Red: " + str(getSpriteColorRed(hit)))
      print("Hash green: " + str(Sprites[index].green) + "   " + _
         "AGK Red: " + str(getSpriteColorGreen(hit)))
      print("Hash blue: " + str(Sprites[index].blue) + "   " + _
         "AGK Red: " + str(getSpriteColorBlue(hit)))
The ‘hit' variable stores the sprite number that our mouse is hovering over. Normally, to find the corresponding sprite in our array, we'd have to search for it via a loop, however, since we stored the sprite's associated index in the Hash Table, all we need to do is retrieve it. Using the sprite number as the key (as shown above when filling the array) we use the getUserDataFromHashset(hit) to return our index for that sprite. Keep in mind that this retrieval should be almost instant, possibly a little searching needed as described above. Finally, we can simply plug the index value into our sprites[] array to gain instant access to the sprite.
To view the entire contents of the Hash Table, you can use the writeHashSetToFile() function.
This is one possibility for the contents of the Hash Table when inserting the numbers 10,20,30...100
[0]: val=0 usr=0 occ=0
[1]: val=50 usr=50 occ=1 hash=1
[2]: val=0 usr=0 occ=0
[3]: val=60 usr=60 occ=1 hash=3
[4]: val=0 usr=0 occ=0
[5]: val=70 usr=70 occ=1 hash=5
[6]: val=0 usr=0 occ=0
[7]: val=80 usr=80 occ=1 hash=7
[8]: val=0 usr=0 occ=0
[9]: val=90 usr=90 occ=1 hash=9
[10]: val=0 usr=0 occ=0
[11]: val=10 usr=10 occ=1 hash=11
[12]: val=100 usr=100 occ=1 hash=11 ?-- collision!
[13]: val=20 usr=20 occ=1 hash=13
[14]: val=0 usr=0 occ=0
[15]: val=30 usr=30 occ=1 hash=15
[16]: val=0 usr=0 occ=0
[17]: val=40 usr=40 occ=1 hash=17
[18]: val=0 usr=0 occ=0
Notice that in most cases, the hash value of an entry is its index in the Hash Table. The exception to this is a collision that has occurred, both 10 and 100 give the same hash values fo 11 in this case. Hence, the Hash Table has performed some linear probing to find the next available spot after the original hash value. In order to retrieve the user data at 100 (or to delete the entry 100) the Hash Table has to search for it but will only take one iteration of a loop before it's found. A value of zero is treated as an empty space as NULL does not exist in the AGK language. Also note how spread out the entries are allowing for efficient catering for collisions. Before it begins to get crowded, the Hash Table will resize in order to maintain a desirable ratio of entries to empty spaces.
So far the Hash Table sounds like it has no major drawbacks. It's fast, user friendly and not highly complex however there are some disadvantages to Hash Tables. The most obvious and impacting is its large memory footprint. In order to perform quickly, the Hash Table requires more than the minimal amount of memory needed to hold all entries. This implementation uses approximately double the minimal amount of memory needed. Also, the entire Hash Table is needed alongside your own arrays. In the balancing act between processing and memory, Hash Tables lie on the memory extremity.
The Hash Table provides us with very fast insertion and retrieval methods when we don't want to handle indices of unique data ourselves but to operate quickly, it requires a large amount memory in proportion to the data it holds. Nevertheless, it is a powerful card to have in our hands which can be played to our advantage.
This article was presented in Issue 17 of the ADG newsletter. We welcome all independent developers to join us, the pre-requisite is simply that you are eager to share experience and resources with your fellow developers.
From The Forums
The 20 Line Challenge has always inspired people to do great things in very little amounts of code. Here you can see how a flower-like collection of splines is put to good effect.
Again, the challenge to make great things in just a few lines proves it is possible to make a sprite editor! Use the full palette to create 32x32 sprites and save your creations too.

Keep up to date with TGC on Facebook
![]() Join over 5,100 fans on TGC's Facebook page to keep bang up to date on news, user projects from the forums and discussions. At the time of writing we have just seen our 5,001st fan sign up to the Facebook group!
Join over 5,100 fans on TGC's Facebook page to keep bang up to date on news, user projects from the forums and discussions. At the time of writing we have just seen our 5,001st fan sign up to the Facebook group!
We're keen to hear from all our avid users and we always love to hear what you've been up to with the tools we sell. So if you have something you want to share with the wider TGC audience why not post it into the TGC Facebook page?
Don't forget you can also join our FPSC Reloaded and AGK fan pages too.
The Game Creators News
News, views, product launches, videos, tutorials, model packs,
community projects and competitions;
you will find all of them on The Games Creators News site.
All of the newsletter articles, tutorials and announcements are now online, and available as soon as it hits the press.
 Subscribe using your Favourite Newsreader
 Subscribe using your Favourite Newsreader
 You can subscribe to our newsfeed using RSS, making delivery of our featured articles even more slick and efficient. The address for your reader of choice is:
//www.thegamecreators.com/news/feed
Add the feed to your mobile device, the example shown here is the News App that comes as standard on the Blackberry PlayBook; Read your news on the move!

Alternatively, use Google Reader on your Netbook or Desktop computer to browse the headlines at your leisure. You can use the monthly archives to review older information, and tutorials that will be as valuable in 12 months as they are today. You'll find numerous ways to browse by category and keywords, and even catch up with Lee Bamber's Tweets in the same interface!
"Any sufficiently advanced technology is indistinguishable from magic."
Arthur C Clarke